4. Wiring inputs and outputs
Requirements
- You have done the Create my first job tutorial
What you will learn
- Wiring tasks
- Export data from a user selection to an Excel file
Learn by example
We are going to enrich the previous Job by generating an Excel file from the items exported. The expected result is to generate this kind of file from a user selection:
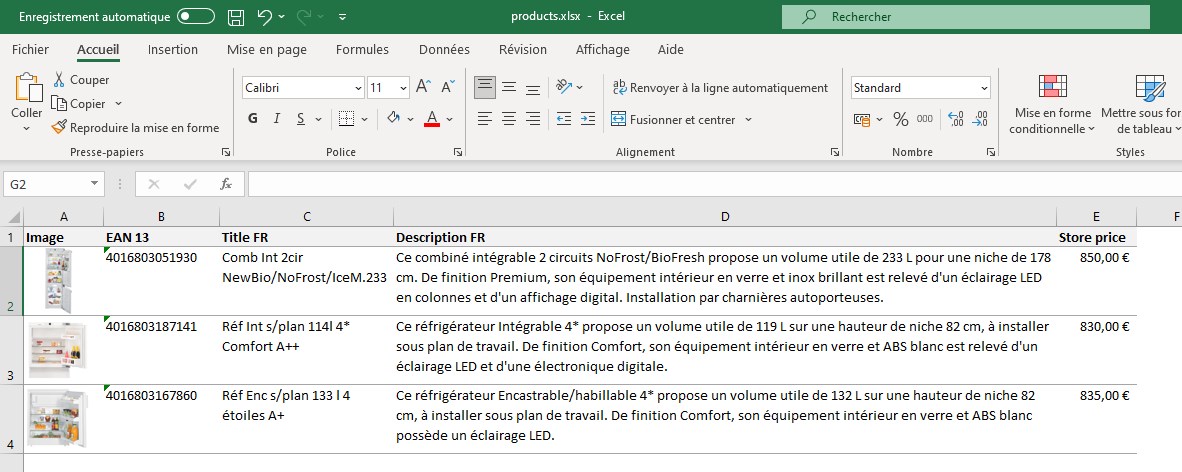
Functionally we are going to update the Job Export excel like this:
Tasks
- Export Items Export items selected by user
- Transform XSLT Transform the xml to the format expected by the task Generate Excel
- Generate Excel Generate the .xlsx file.
To do so, first add the Transform XSLT task by using the autocomplete using Ctrl + Space, you must have this:
json
{
    "schema": "1.0",
    "key": "my_first_job",
    "title": "My first job",
    "tasks": [
        {
            "name": "table-export-items",
            "taskReferenceName": "table_export_items",
            "description": "Export items select by user",
            "optional": false,
            "type": "SUB_WORKFLOW",
            "inputParameters": {
                "tableKey": "PL_DEMO_PRODUCTS",
                "mode": "USER_SELECTION",
                "fileName": "items.xml"
            }
        },
        {
            "name": "file-transformation-xslt",
            "taskReferenceName": "file_transformation_xslt",
            "description": "Transform items for the Generate Excel file",
            "optional": false,
            "type": "SUB_WORKFLOW",
            "inputParameters": {
                "mode": "FILE",
                "file": "",
                "xslt": "",
                "fileName": "result.xml"
            }
        }
    ]
}
1
2
3
4
5
6
7
8
9
10
11
12
13
14
15
16
17
18
19
20
21
22
23
24
25
26
27
28
29
30
31
32
2
3
4
5
6
7
8
9
10
11
12
13
14
15
16
17
18
19
20
21
22
23
24
25
26
27
28
29
30
31
32
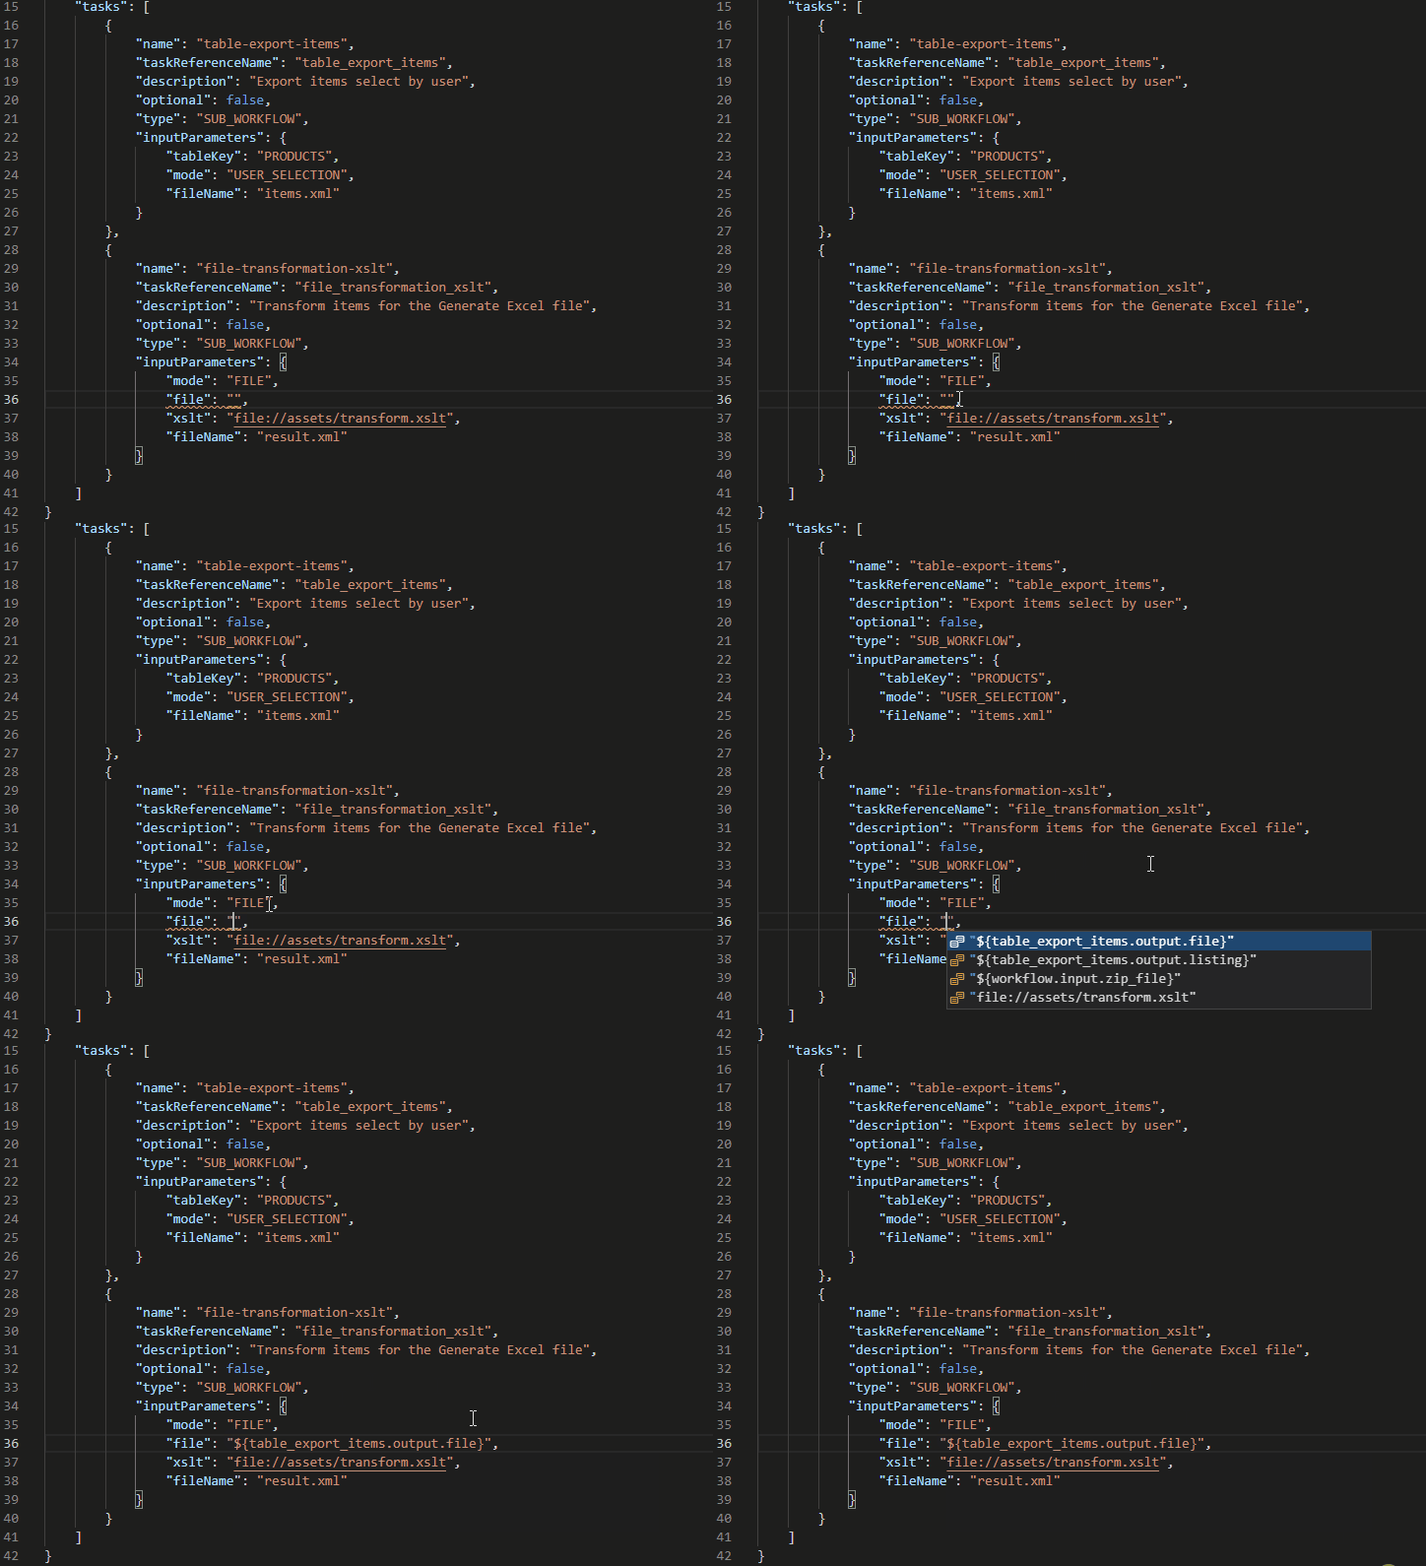
Then in the file property use the autocomplete Ctrl + Space to get valid previous outputs task. You will see that the previous task table_export_items has different outputs, but for now select the output file of the task table_export_items by selecting ${table_export_items.output.file}:
Best practice
Always use the autocomplete of the vs code extension, this will display only previous valid available outputs. If you have a doubt, remove the value and use the shortcut Ctrl + Space again.
To get the output of a previous task, the naming convention is to use:
${previous-taskReferenceName.output.valid-output-name}
But as described above you should always use the autocomplete.
Now you should have the file property filled like this:
json
{
    "schema": "1.0",
    "key": "my_first_job",
    "title": "My first job",
    "tasks": [
        {
            "name": "table-export-items",
            "taskReferenceName": "table_export_items",
            "description": "Export items select by user",
            "optional": false,
            "type": "SUB_WORKFLOW",
            "inputParameters": {
                "tableKey": "PL_DEMO_PRODUCTS",
                "mode": "USER_SELECTION",
                "fileName": "items.xml"
            }
        },
        {
            "name": "file-transformation-xslt",
            "taskReferenceName": "file_transformation_xslt",
            "description": "Transform items for the Generate Excel file",
            "optional": false,
            "type": "SUB_WORKFLOW",
            "inputParameters": {
                "mode": "FILE",
                "file": "${table_export_items.output.file}",
                "xslt": "file://assets/",
                "fileName": "result.xml"
            }
        }
    ]
}
1
2
3
4
5
6
7
8
9
10
11
12
13
14
15
16
17
18
19
20
21
22
23
24
25
26
27
28
29
30
31
32
2
3
4
5
6
7
8
9
10
11
12
13
14
15
16
17
18
19
20
21
22
23
24
25
26
27
28
29
30
31
32
You should have an error on the xslt property, we will correct it later in the tutorial, for now we only focus on wiring tasks.
Next add the Generate Excel task using the autocomplete Ctrl + Space, and in the request property use the autocomplete to select the output file of the transform xslt task. You must have this:
json
{
    "schema": "1.0",
    "key": "my_first_job",
    "title": "My first job",
    "tasks": [
        {
            "name": "table-export-items",
            "taskReferenceName": "table_export_items",
            "description": "Export items select by user",
            "optional": false,
            "type": "SUB_WORKFLOW",
            "inputParameters": {
                "tableKey": "PL_DEMO_PRODUCTS",
                "mode": "USER_SELECTION",
                "fileName": "items.xml"
            }
        },
        {
            "name": "file-transformation-xslt",
            "taskReferenceName": "file_transformation_xslt",
            "description": "Transform items for the Generate Excel file",
            "optional": false,
            "type": "SUB_WORKFLOW",
            "inputParameters": {
                "mode": "FILE",
                "file": "${table_export_items.output.file}",
                "xslt": "file://assets/",
                "fileName": "result.xml"
            }
        },
        {
            "name": "file-generation-xlsx",
            "taskReferenceName": "file_generation_xlsx",
            "description": "Generate the Excel file",
            "optional": false,
            "type": "SUB_WORKFLOW",
            "inputParameters": {
                "request": "${file_transformation_xslt.output.file}",
                "templates": [
                    {
                        "key": "",
                        "file": "file://assets/"
                    }
                ]
            }
        }
    ]
}
1
2
3
4
5
6
7
8
9
10
11
12
13
14
15
16
17
18
19
20
21
22
23
24
25
26
27
28
29
30
31
32
33
34
35
36
37
38
39
40
41
42
43
44
45
46
47
48
2
3
4
5
6
7
8
9
10
11
12
13
14
15
16
17
18
19
20
21
22
23
24
25
26
27
28
29
30
31
32
33
34
35
36
37
38
39
40
41
42
43
44
45
46
47
48
The tasks are correctly wired, before going further we will dive in the outputs and inputs compatible types.
Output and input types
The outputs and inputs of a task can have one of these three types:
| Type | Description |
|---|---|
| FILE | A single file |
| FILES | An array of files |
| ENUM | An enum that must be used with the Decision task |
When you are wiring two tasks, it can only be done with the same type for output and input.
To get the type of each output, you must read the reference of the task in the section Outputs, for example for the tasks:
Now we will see how the output of the task Export Items is transformed to the format expected by the task Generate Excel.
Transform XSLT
The format exported by the task Export Items is defined here and the format expected by the task Generate Excel is defined here.
To do the transformation we use xslt. In this tutorial we will not present the xslt language, we will just use the code below. You will learn more about xslt in the ninth tutorial.
For this tutorial create a file named transform.xslt in the root of the assets folder. Then use the snippet sty to initiate your xslt file. You should have this result:
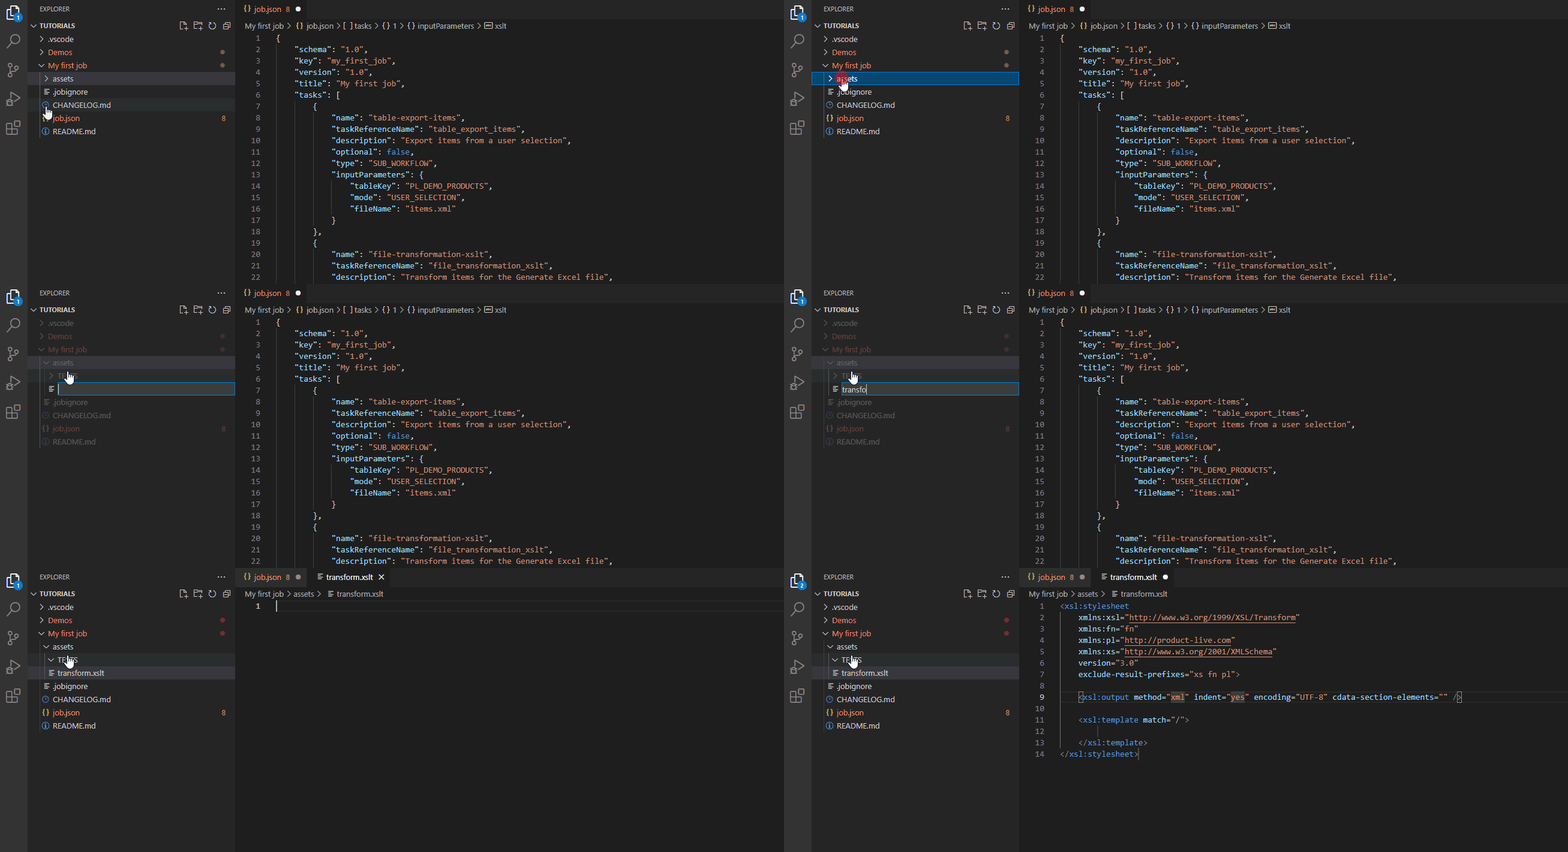
Then copy the code highlighted below within your xslt:
xml
<xsl:stylesheet
xmlns:xsl="http://www.w3.org/1999/XSL/Transform"
xmlns:fn="fn"
xmlns:pl="http://product-live.com"
xmlns:xs="http://www.w3.org/2001/XMLSchema"
version="3.0"
exclude-result-prefixes="xs fn pl">
<xsl:output method="xml" indent="yes" encoding="UTF-8" cdata-section-elements="" />
<xsl:template match="/">
<Generate-Excel>
<File>
<File-Name>products.xlsx</File-Name>
<Template-Key>template-tutorial</Template-Key>
<Sheets>
<Sheet>
<Sheet-Name>products</Sheet-Name>
<Cells>
<xsl:for-each select="/Table/Items/Item">
<!-- + 1 for headers -->
<xsl:variable name="position" select="position()+1" />
<xsl:if test="exists(Field[@key='MAIN_VIEW'])">
<!-- The image is resized by the Image API with the width and height properties -->
<Cell-Image line="{$position}" column="1"><xsl:value-of select="Field[@key='MAIN_VIEW']"/>?width=175&height=175</Cell-Image>
</xsl:if>
<xsl:if test="exists(Identifier[@key='EAN_13'])">
<Cell-Text line="{$position}" column="2"><xsl:value-of select="Identifier[@key='EAN_13']"/></Cell-Text>
</xsl:if>
<xsl:if test="exists(Field[@key='TITLE_FR'])">
<Cell-Text line="{$position}" column="3"><xsl:value-of select="Field[@key='TITLE_FR']"/></Cell-Text>
</xsl:if>
<xsl:if test="exists(Field[@key='DESCRIPTION_FR'])">
<Cell-Text line="{$position}" column="4"><xsl:value-of select="Field[@key='DESCRIPTION_FR']"/></Cell-Text>
</xsl:if>
<xsl:if test="exists(Field[@key='STORE_PRICE'])">
<Cell-Number line="{$position}" column="5"><xsl:value-of select="Field[@key='STORE_PRICE']"/></Cell-Number>
</xsl:if>
</xsl:for-each>
</Cells>
</Sheet>
</Sheets>
</File>
</Generate-Excel>
</xsl:template>
</xsl:stylesheet>1
2
3
4
5
6
7
8
9
10
11
12
13
14
15
16
17
18
19
20
21
22
23
24
25
26
27
28
29
30
31
32
33
34
35
36
37
38
39
40
41
42
43
44
45
46
2
3
4
5
6
7
8
9
10
11
12
13
14
15
16
17
18
19
20
21
22
23
24
25
26
27
28
29
30
31
32
33
34
35
36
37
38
39
40
41
42
43
44
45
46
Save the xslt file, and then reference this file in your Job like this:

Always use the autocomplete with Ctrl + Space. If you don't see the file, ensure that you have created the file in the assets folder and not in the TESTS folder. Files set in the TESTS folder are not visible in the autocompletion.
Generate Excel
The last thing to do is to configure the template used for the task Generate Excel. In this tutorial we will not present how this task works, but if you want to deeply understand how the Generate Excel task works read the documentation of the task.
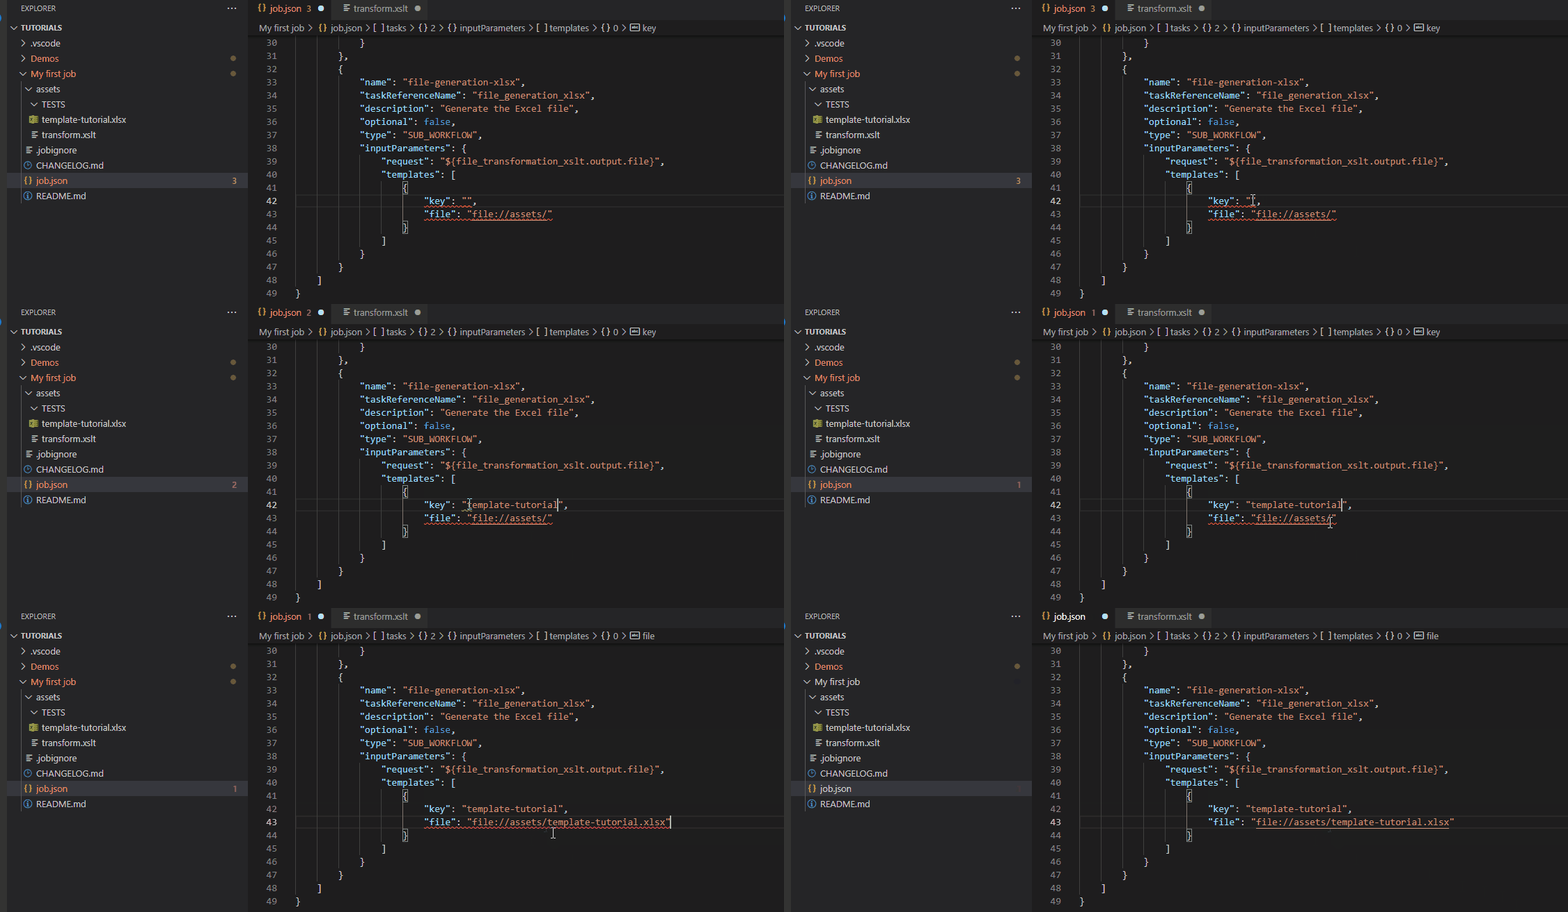
Now download this file template-tutorial.xlsx and add it at the root of the assets folder. Then in the key property enter template-tutorial and in the file property use the autocomplete with Ctrl + Space to select the template-tutorial.xlsx file. You must have:
Info
Formatting the template is done directly in Excel. Just ensure to use the right Cell type in the XML between Cell-Text for text cells, Cell-Number for number cells, Cell-Image for cells with images, and Cell-Link for cells with links.
Update Job name and icon
Rename the title of the Job Export excel and add the icon property with the value file-excel (use the autocomplete).
![]()
Best practice
The icon will be displayed in https://app.product-live.com when the user click the Actions button. Use icons to visually identify your Jobs.
Your final job.json file must be:
json
{
    "schema": "1.0",
    "key": "my_first_job",
    "title": "Export excel",
    "icon": "file-excel",
    "tasks": [
        {
            "name": "table-export-items",
            "taskReferenceName": "table_export_items",
            "description": "Export items from a user selection",
            "optional": false,
            "type": "SUB_WORKFLOW",
            "inputParameters": {
                "tableKey": "PL_DEMO_PRODUCTS",
                "mode": "USER_SELECTION",
                "fileName": "items.xml"
            }
        },
        {
            "name": "file-transformation-xslt",
            "taskReferenceName": "file_transformation_xslt",
            "description": "Transform items for the Generate Excel file",
            "optional": false,
            "type": "SUB_WORKFLOW",
            "inputParameters": {
                "mode": "FILE",
                "file": "${table_export_items.output.file}",
                "xslt": "file://assets/transform.xslt",
                "fileName": "result.xml"
            }
        },
        {
            "name": "file-generation-xlsx",
            "taskReferenceName": "file_generation_xlsx",
            "description": "Generate the Excel file",
            "optional": false,
            "type": "SUB_WORKFLOW",
            "inputParameters": {
                "request": "${file_transformation_xslt.output.file}",
                "templates": [
                    {
                        "key": "template-tutorial",
                        "file": "file://assets/template-tutorial.xlsx"
                    }
                ]
            }
        }
    ]
}
1
2
3
4
5
6
7
8
9
10
11
12
13
14
15
16
17
18
19
20
21
22
23
24
25
26
27
28
29
30
31
32
33
34
35
36
37
38
39
40
41
42
43
44
45
46
47
48
49
2
3
4
5
6
7
8
9
10
11
12
13
14
15
16
17
18
19
20
21
22
23
24
25
26
27
28
29
30
31
32
33
34
35
36
37
38
39
40
41
42
43
44
45
46
47
48
49
Important
Job key can not be updated.
Package and run
Now save all your opened files and package your Job and package your Job.
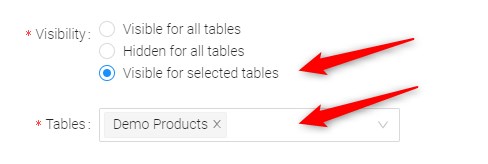
Then go to https://settings.product-live.com in the tab Data Factory > Jobs and update the Job My first job with the Job you have packaged, and set it visible for the table Products demo.
Then go to https://app.product-live.com, select three products and click on Actions > Export excel to execute the job (if you don't see the job click on Ctrl + Shift + R to refresh the page).
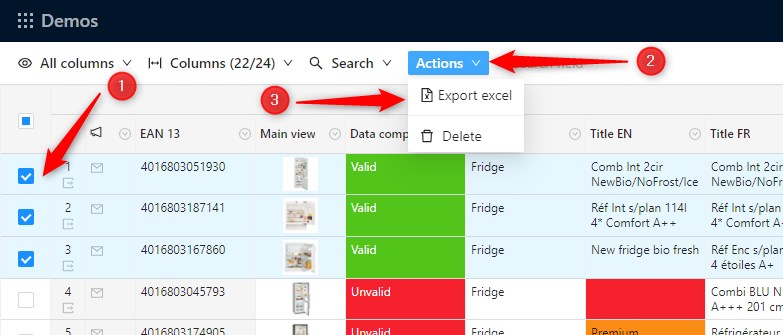
Click the Run button and wait until the end of the execution.
Now go to https://settings.product-live.com in the tab Data Factory > Actions. At the end of the execution in the Generate Excel detail you must be able to download the file generated:
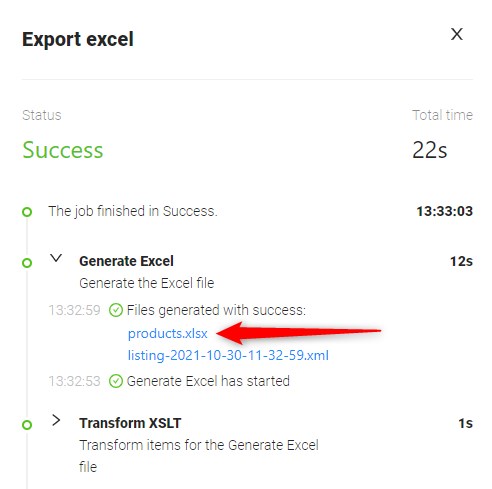
The expected result is:

We will see in the next tutorial how to display the file generated to users in https://app.product-live.com.
Advanced
Handle multiple files
A use case could be as follow: you have multiple csv files in sFTP server, but you don't know how much files. For example they are orders from an OMS (Order Management System). You want to get all the files in the sFTP server and then, convert all this csv files to xml, and then merge them into one file to import them in Product-Live.
For this, some Tasks have a mode property which can take values or .
Usually the mode implies that there must be a file inputParameters, and the mode that there must be a files inputParameters.
You can view the mode = FILES as a loop that will do the same Task whatever input files they are. In addition some Tasks will also automatically merge the result for you.
Other types
There is three types of input and outputs:
| Type | Description |
|---|---|
| A file | |
| An array of files | |
An enum, usually with values YES | NO | |
| A number |
Only inputs and outputs with the same type can be wired.
For example if you look at the documentation of the tasks: FTP Get and CSV to XML, you can read it as:
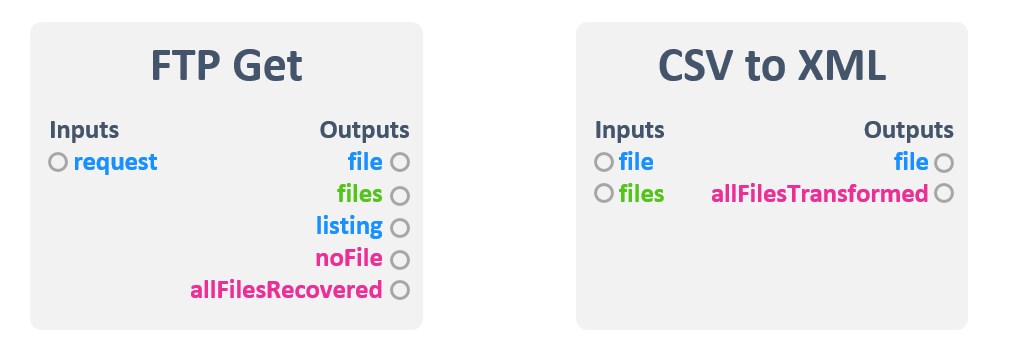
Only outputs and inputs with the same color (= type) can be wired.
What you have learned
- Wiring tasks in the job.json is easy with the autocomplete of the extension
- Only compatible output and input can be wired
- Transforming xml formats are done with the xslt task.
Next
You will learn how to display the results of tasks to users in the User outputs tutorial.