10. Introduction XSLT, XPath, XSD
Requirements
- You have done all the previous tutorials
Product-Live Data Factory tasks system use XML files in input and output. So usually in order to wire two tasks you have to transform an XML file to another XML file format.
In the previous tutorial wa have seen that we have transformed the output of the task Export Items to the format expected by the task Generate Excel.
Below we have selected 3 items from the Products Demo table and used the Export Items task. Click on Input (the file exported by the Export Items task) and then Output (the file generated by the xslt):
xml
<Table key="PL_DEMO_PRODUCTS">
    <Items>
        <Item partition="ACTIVES" created="2021-10-12T08:29:45.000Z" updated="2021-10-18T12:51:46.000Z">
            <Identifier key="EAN_13">4016803051930</Identifier>
            <Classification key="TYPOLOGY">FRIDGE</Classification>
            <Conditional-Formatting key="DATA_COMPLIANCE">VALID</Conditional-Formatting>
            <Field key="TITLE_EN">Comb Int 2cir NewBio/NoFrost/IceM.233</Field>
            <Field key="TITLE_FR">Comb Int 2cir NewBio/NoFrost/IceM.233</Field>
            <Field key="DESCRIPTION_EN">This combined integrated circuits 2 NoFrost / BioFresh provides a useful volume of 233 L for a niche 178 cm. Premium finish, the interior equipment of glass and polished stainless is raised LED lighting columns and a digital display.</Field>
            <Field key="DESCRIPTION_FR">Ce combiné intégrable 2 circuits NoFrost/BioFresh propose un volume utile de 233 L pour une niche de 178 cm. De finition Premium, son équipement intérieur en verre et inox brillant est relevé d'un éclairage LED en colonnes et d'un affichage digital. Installation par charnières autoporteuses.</Field>
            <Field key="STOCK">16</Field>
            <Field key="WEIGHT_KG">43</Field>
            <Field key="STARTING_PRICE">497</Field>
            <Field key="STORE_PRICE">850</Field>
            <Field key="WIDTH_MM">597</Field>
            <Field key="DEPTH_MM">550</Field>
            <Field key="HEIGHT_MM">819</Field>
            <Field key="NEXT_ARRIVAL">2021-06-04Z</Field>
            <Field key="MAIN_VIEW" width-px="1010" height-px="2398" size-kb="1043" file-hash="01b1a3b49ba2f7a1ef120d25e0d36709a6c6ec72c6ca563f9f36396d83d63f73" original-file-name="Fv7TuDvoEAqXA7qH_1625150426065.jpg" color-space="RGB" color-profile="NONE">https://asset.prod.product-live.com/file-map-resize/5f68e75fe44278c9839811d2_documents/redirect/01b1a3b49ba2f7a1ef120d25e0d36709a6c6ec72c6ca563f9f36396d83d63f73</Field>
            <Field key="INSTRUCTIONS" size-kb="665" file-hash="1208de2e3ef5be4da1230dc8fedce3f94f75c330919f0df26621159c3985102d" original-file-name="1208de2e3ef5be4da1230dc8fedce3f94f75c330919f0df26621159c3985102d">https://asset.prod.product-live.com/file-map/5f68e75fe44278c9839811d2_documents/redirect/1208de2e3ef5be4da1230dc8fedce3f94f75c330919f0df26621159c3985102d</Field>
            <Field key="LIFE_CYCLE">NEW</Field>
            <Field key="MAIN_COLOR">WHITE</Field>
            <Field key="COUNTRY_OF_ORIGIN">GERMANY</Field>
            <Field key="SOUND_LEVEL">23</Field>
            <Field key="ENERGY_LABEL" width-px="867" height-px="1787" size-kb="397" file-hash="59e8ea9f4ae6ac8ed3dc08836376c969011f47b38d779feece48366545735081" original-file-name="5C0gUXbhPcMmVv5x_1625150427571.jpg" color-space="RGB" color-profile="NONE">https://asset.prod.product-live.com/file-map-resize/5f68e75fe44278c9839811d2_documents/redirect/59e8ea9f4ae6ac8ed3dc08836376c969011f47b38d779feece48366545735081</Field>
            <Field key="INSTALLATION_DIAGRAM" width-px="1992" height-px="2112" size-kb="560" file-hash="8b9209e60bf3af76e61a0e7f06e04eec712aaeaaadbfa8c8e5b07214684f6d14" original-file-name="4LC3Y9ctnBhFll81_1625150428214.jpg" color-space="RGB" color-profile="NONE">https://asset.prod.product-live.com/file-map-resize/5f68e75fe44278c9839811d2_documents/redirect/8b9209e60bf3af76e61a0e7f06e04eec712aaeaaadbfa8c8e5b07214684f6d14</Field>
            <Field key="FRONT_VIEW" width-px="1038" height-px="2414" size-kb="713" file-hash="7a7c0308324cdb59c0afec42578446769b4076675a1fd6d77d3f1303836ea1a6" original-file-name="NVqcOjQg6LKpFsc7_1625150419259.jpg" color-space="RGB" color-profile="NONE">https://asset.prod.product-live.com/file-map-resize/5f68e75fe44278c9839811d2_documents/redirect/7a7c0308324cdb59c0afec42578446769b4076675a1fd6d77d3f1303836ea1a6</Field>
            <Field key="ENERGY_CLASS">A++</Field>
            <Field key="CHILD_SAFETY">NO</Field>
            <Field key="ICE_TRAY">YES</Field>
            <Field key="EGG_TRAY">YES</Field>
        </Item>
        <Item partition="ACTIVES" created="2021-10-12T08:29:27.000Z" updated="2021-10-18T13:22:17.000Z">
            <Identifier key="EAN_13">4016803187141</Identifier>
            <Classification key="TYPOLOGY">FRIDGE</Classification>
            <Conditional-Formatting key="DATA_COMPLIANCE">VALID</Conditional-Formatting>
            <Field key="TITLE_EN">Réf Int s/plan 114l 4* Comfort A++</Field>
            <Field key="TITLE_FR">Réf Int s/plan 114l 4* Comfort A++</Field>
            <Field key="DESCRIPTION_EN">This refrigerator Built-In 4 * offers a useful volume of 119 L to a height 82 cm niche, to be installed under the work plan.</Field>
            <Field key="DESCRIPTION_FR">Ce réfrigérateur Intégrable 4* propose un volume utile de 119 L sur une hauteur de niche 82 cm, à installer sous plan de travail. De finition Comfort, son équipement intérieur en verre et ABS blanc est relevé d'un éclairage LED et d'une électronique digitale.</Field>
            <Field key="STOCK">11</Field>
            <Field key="WEIGHT_KG">43</Field>
            <Field key="STARTING_PRICE">496</Field>
            <Field key="STORE_PRICE">830</Field>
            <Field key="WIDTH_MM">597</Field>
            <Field key="DEPTH_MM">550</Field>
            <Field key="HEIGHT_MM">819</Field>
            <Field key="NEXT_ARRIVAL">2021-06-02Z</Field>
            <Field key="MAIN_VIEW" width-px="1597" height-px="1535" size-kb="632" file-hash="e4a30f384a5cb59dea5d4b71f5f73d2ffc6c5d56106fe833c86a81af6f767880" original-file-name="DdUTM0g0XThgfuR4_1625150443133.jpg" color-space="RGB" color-profile="NONE">https://asset.prod.product-live.com/file-map-resize/5f68e75fe44278c9839811d2_documents/redirect/e4a30f384a5cb59dea5d4b71f5f73d2ffc6c5d56106fe833c86a81af6f767880</Field>
            <Field key="INSTRUCTIONS" size-kb="665" file-hash="1208de2e3ef5be4da1230dc8fedce3f94f75c330919f0df26621159c3985102d" original-file-name="1208de2e3ef5be4da1230dc8fedce3f94f75c330919f0df26621159c3985102d">https://asset.prod.product-live.com/file-map/5f68e75fe44278c9839811d2_documents/redirect/1208de2e3ef5be4da1230dc8fedce3f94f75c330919f0df26621159c3985102d</Field>
            <Field key="MAIN_COLOR">WHITE</Field>
            <Field key="COUNTRY_OF_ORIGIN">GERMANY</Field>
            <Field key="SOUND_LEVEL">21</Field>
            <Field key="ENERGY_LABEL" width-px="867" height-px="1787" size-kb="394" file-hash="e0106dfb8491989a252838268d293bcfa41f2b2ccb8ac2ea63d5c7696c18b18e" original-file-name="EGymleCImH1lBVA8_1625150442335.jpg" color-space="RGB" color-profile="NONE">https://asset.prod.product-live.com/file-map-resize/5f68e75fe44278c9839811d2_documents/redirect/e0106dfb8491989a252838268d293bcfa41f2b2ccb8ac2ea63d5c7696c18b18e</Field>
            <Field key="INSTALLATION_DIAGRAM" width-px="2296" height-px="2603" size-kb="681" file-hash="bdad59cd011d8272d03303d47a3b1eb57d24a00cda9c634cb17157e6916ba022" original-file-name="ecpy3l7lwsbod1mx_1625150444610.jpg" color-space="RGB" color-profile="NONE">https://asset.prod.product-live.com/file-map-resize/5f68e75fe44278c9839811d2_documents/redirect/bdad59cd011d8272d03303d47a3b1eb57d24a00cda9c634cb17157e6916ba022</Field>
            <Field key="FRONT_VIEW" width-px="800" height-px="800" size-kb="228" file-hash="62ed1a1819e5ad6813810cc6be4223fbe2c247663b66444eac6bae32f5bf487b" original-file-name="wmK8wJbndqyax7pD_1625150445256.jpg" color-space="RGB" color-profile="NONE">https://asset.prod.product-live.com/file-map-resize/5f68e75fe44278c9839811d2_documents/redirect/62ed1a1819e5ad6813810cc6be4223fbe2c247663b66444eac6bae32f5bf487b</Field>
            <Field key="ENERGY_CLASS">A++</Field>
            <Field key="CHILD_SAFETY">YES</Field>
            <Field key="ICE_TRAY">YES</Field>
            <Field key="EGG_TRAY">NO</Field>
        </Item>
        <Item partition="ACTIVES" created="2021-10-12T08:29:15.000Z" updated="2021-10-18T13:22:19.000Z">
            <Identifier key="EAN_13">4016803167860</Identifier>
            <Classification key="TYPOLOGY">FRIDGE</Classification>
            <Conditional-Formatting key="DATA_COMPLIANCE">VALID</Conditional-Formatting>
            <Field key="TITLE_EN">New fridge bio fresh</Field>
            <Field key="TITLE_FR">Réf Enc s/plan 133 l 4 étoiles A+</Field>
            <Field key="DESCRIPTION_EN">This refrigerator Built / skinnable 4 * offers a useful volume of 132 L to a height 82 cm niche, to be installed under the work plan. Comfort finish, the interior equipment in glass and ABS has a white LED lighting.</Field>
            <Field key="DESCRIPTION_FR">Ce réfrigérateur Encastrable/habillable 4* propose un volume utile de 132 L sur une hauteur de niche 82 cm, à installer sous plan de travail. De finition Comfort, son équipement intérieur en verre et ABS blanc possède un éclairage LED.</Field>
            <Field key="STOCK">31</Field>
            <Field key="WEIGHT_KG">38.2</Field>
            <Field key="STARTING_PRICE">496</Field>
            <Field key="STORE_PRICE">835</Field>
            <Field key="WIDTH_MM">597</Field>
            <Field key="DEPTH_MM">569</Field>
            <Field key="HEIGHT_MM">818</Field>
            <Field key="NEXT_ARRIVAL">2021-06-02Z</Field>
            <Field key="MAIN_VIEW" width-px="1745" height-px="1713" size-kb="1011" file-hash="2bfae53a8eba5db75b356fdefb4ad440dfd87acd4a23fcea66cbd5ecf191f57c" original-file-name="nVqhvfBVSyV6JtrH_1625150327893.jpg" color-space="RGB" color-profile="NONE">https://asset.prod.product-live.com/file-map-resize/5f68e75fe44278c9839811d2_documents/redirect/2bfae53a8eba5db75b356fdefb4ad440dfd87acd4a23fcea66cbd5ecf191f57c</Field>
            <Field key="INSTRUCTIONS" size-kb="665" file-hash="1208de2e3ef5be4da1230dc8fedce3f94f75c330919f0df26621159c3985102d" original-file-name="1208de2e3ef5be4da1230dc8fedce3f94f75c330919f0df26621159c3985102d">https://asset.prod.product-live.com/file-map/5f68e75fe44278c9839811d2_documents/redirect/1208de2e3ef5be4da1230dc8fedce3f94f75c330919f0df26621159c3985102d</Field>
            <Field key="LIFE_CYCLE">NEW</Field>
            <Field key="MAIN_COLOR">WHITE</Field>
            <Field key="COUNTRY_OF_ORIGIN">GERMANY</Field>
            <Field key="SOUND_LEVEL">21</Field>
            <Field key="ENERGY_LABEL" width-px="867" height-px="1787" size-kb="392" file-hash="c40b532e5d71c055a60d1ef8562bc698ba16e07f054111b7e1e8d423935d7ba6" original-file-name="Ge8WY0La83mmaqR2_1625150325378.jpg" color-space="RGB" color-profile="NONE">https://asset.prod.product-live.com/file-map-resize/5f68e75fe44278c9839811d2_documents/redirect/c40b532e5d71c055a60d1ef8562bc698ba16e07f054111b7e1e8d423935d7ba6</Field>
            <Field key="INSTALLATION_DIAGRAM" width-px="969" height-px="749" size-kb="147" file-hash="792275907476e1d62c5352a2c52df9170c7de36a2194bd978ebd926710bd7ec3" original-file-name="07r1keNqsKo5NV3z_1625150326084.jpg" color-space="RGB" color-profile="NONE">https://asset.prod.product-live.com/file-map-resize/5f68e75fe44278c9839811d2_documents/redirect/792275907476e1d62c5352a2c52df9170c7de36a2194bd978ebd926710bd7ec3</Field>
            <Field key="FRONT_VIEW" width-px="1752" height-px="1669" size-kb="642" file-hash="cbaa199b20ebc4a318931a226b76e25e702153e87f360dda542763c5a1b1aa8e" original-file-name="OkCrY908V3d8blIA_1625150326711.jpg" color-space="RGB" color-profile="NONE">https://asset.prod.product-live.com/file-map-resize/5f68e75fe44278c9839811d2_documents/redirect/cbaa199b20ebc4a318931a226b76e25e702153e87f360dda542763c5a1b1aa8e</Field>
            <Field key="ENERGY_CLASS">A+++</Field>
            <Field key="CHILD_SAFETY">YES</Field>
            <Field key="ICE_TRAY">YES</Field>
            <Field key="EGG_TRAY">NO</Field>
        </Item>
    </Items>
</Table>
1
2
3
4
5
6
7
8
9
10
11
12
13
14
15
16
17
18
19
20
21
22
23
24
25
26
27
28
29
30
31
32
33
34
35
36
37
38
39
40
41
42
43
44
45
46
47
48
49
50
51
52
53
54
55
56
57
58
59
60
61
62
63
64
65
66
67
68
69
70
71
72
73
74
75
76
77
78
79
80
81
82
83
84
85
86
87
88
89
90
91
92
93
2
3
4
5
6
7
8
9
10
11
12
13
14
15
16
17
18
19
20
21
22
23
24
25
26
27
28
29
30
31
32
33
34
35
36
37
38
39
40
41
42
43
44
45
46
47
48
49
50
51
52
53
54
55
56
57
58
59
60
61
62
63
64
65
66
67
68
69
70
71
72
73
74
75
76
77
78
79
80
81
82
83
84
85
86
87
88
89
90
91
92
93
xml
<xsl:stylesheet
xmlns:xsl="http://www.w3.org/1999/XSL/Transform"
xmlns:fn="fn"
xmlns:pl="http://product-live.com"
xmlns:xs="http://www.w3.org/2001/XMLSchema"
version="3.0"
exclude-result-prefixes="xs fn pl">
<xsl:output method="xml" indent="yes" encoding="UTF-8" cdata-section-elements="" />
<xsl:param name="language" />
<xsl:template match="/">
<Generate-Excel>
<File>
<File-Name>products.xlsx</File-Name>
<Template-Key>template-tutorial</Template-Key>
<Sheets>
<Sheet>
<Sheet-Name>products</Sheet-Name>
<Cells>
<!-- Update headers depending the language param -->
<xsl:choose>
<xsl:when test="$language='english'">
<Cell-Text line="1" column="3">Title EN</Cell-Text>
<Cell-Text line="1" column="4">Description EN</Cell-Text>
<Cell-Text line="1" column="5">Store price</Cell-Text>
</xsl:when>
<xsl:otherwise>
<Cell-Text line="1" column="3">Title FR</Cell-Text>
<Cell-Text line="1" column="4">Description FR</Cell-Text>
<Cell-Text line="1" column="5">Prix magasin</Cell-Text>
</xsl:otherwise>
</xsl:choose>
<xsl:for-each select="/Table/Items/Item">
<xsl:variable name="position" select="position()+1" />
<xsl:if test="Field[@key='MAIN_VIEW'] != ''">
<Cell-Image line="{$position}" column="1"><xsl:value-of select="Field[@key='MAIN_VIEW']"/>?width=175&height=175</Cell-Image>
</xsl:if>
<xsl:if test="Identifier[@key='EAN_13'] != ''">
<Cell-Text line="{$position}" column="2"><xsl:value-of select="Identifier[@key='EAN_13']"/></Cell-Text>
</xsl:if>
<!-- Update items depending the language param -->
<xsl:choose>
<xsl:when test="$language='english'">
<xsl:if test="Field[@key='TITLE_EN'] != ''">
<Cell-Text line="{$position}" column="3"><xsl:value-of select="Field[@key='TITLE_EN']"/></Cell-Text>
</xsl:if>
<xsl:if test="Field[@key='DESCRIPTION_EN'] != ''">
<Cell-Text line="{$position}" column="4"><xsl:value-of select="Field[@key='DESCRIPTION_EN']"/></Cell-Text>
</xsl:if>
</xsl:when>
<xsl:otherwise>
<xsl:if test="Field[@key='TITLE_FR'] != ''">
<Cell-Text line="{$position}" column="3"><xsl:value-of select="Field[@key='TITLE_FR']"/></Cell-Text>
</xsl:if>
<xsl:if test="Field[@key='DESCRIPTION_FR'] != ''">
<Cell-Text line="{$position}" column="4"><xsl:value-of select="Field[@key='DESCRIPTION_FR']"/></Cell-Text>
</xsl:if>
</xsl:otherwise>
</xsl:choose>
<xsl:if test="Field[@key='STORE_PRICE'] != ''">
<Cell-Number line="{$position}" column="5"><xsl:value-of select="Field[@key='STORE_PRICE']"/></Cell-Number>
</xsl:if>
</xsl:for-each>
</Cells>
</Sheet>
</Sheets>
</File>
</Generate-Excel>
</xsl:template>
</xsl:stylesheet>1
2
3
4
5
6
7
8
9
10
11
12
13
14
15
16
17
18
19
20
21
22
23
24
25
26
27
28
29
30
31
32
33
34
35
36
37
38
39
40
41
42
43
44
45
46
47
48
49
50
51
52
53
54
55
56
57
58
59
60
61
62
63
64
65
66
67
68
69
70
71
72
2
3
4
5
6
7
8
9
10
11
12
13
14
15
16
17
18
19
20
21
22
23
24
25
26
27
28
29
30
31
32
33
34
35
36
37
38
39
40
41
42
43
44
45
46
47
48
49
50
51
52
53
54
55
56
57
58
59
60
61
62
63
64
65
66
67
68
69
70
71
72
xml
<Generate-Excel>
<File>
<File-Name>products.xlsx</File-Name>
<Template-Key>template-tutorial</Template-Key>
<Sheets>
<Sheet>
<Sheet-Name>products</Sheet-Name>
<Cells>
<Cell-Text line="1" column="3">Title EN</Cell-Text>
<Cell-Text line="1" column="4">Description EN</Cell-Text>
<Cell-Text line="1" column="5">Store price</Cell-Text>
<Cell-Image line="2" column="1">https://asset.prod.product-live.com/file-map-resize/5f68e75fe44278c9839811d2_documents/redirect/01b1a3b49ba2f7a1ef120d25e0d36709a6c6ec72c6ca563f9f36396d83d63f73?width=175&height=175</Cell-Image>
<Cell-Text line="2" column="2">4016803051930</Cell-Text>
<Cell-Text line="2" column="3">Comb Int 2cir NewBio/NoFrost/IceM.233</Cell-Text>
<Cell-Text line="2" column="4">This combined integrated circuits 2 NoFrost / BioFresh provides a useful volume of 233 L for a niche 178 cm. Premium finish, the interior equipment of glass and polished stainless is raised LED lighting columns and a digital display.</Cell-Text>
<Cell-Number line="2" column="5">850</Cell-Number>
<Cell-Image line="3" column="1">https://asset.prod.product-live.com/file-map-resize/5f68e75fe44278c9839811d2_documents/redirect/e4a30f384a5cb59dea5d4b71f5f73d2ffc6c5d56106fe833c86a81af6f767880?width=175&height=175</Cell-Image>
<Cell-Text line="3" column="2">4016803187141</Cell-Text>
<Cell-Text line="3" column="3">Réf Int s/plan 114l 4* Comfort A++</Cell-Text>
<Cell-Text line="3" column="4">This refrigerator Built-In 4 * offers a useful volume of 119 L to a height 82 cm niche, to be installed under the work plan.</Cell-Text>
<Cell-Number line="3" column="5">830</Cell-Number>
<Cell-Image line="4" column="1">https://asset.prod.product-live.com/file-map-resize/5f68e75fe44278c9839811d2_documents/redirect/2bfae53a8eba5db75b356fdefb4ad440dfd87acd4a23fcea66cbd5ecf191f57c?width=175&height=175</Cell-Image>
<Cell-Text line="4" column="2">4016803167860</Cell-Text>
<Cell-Text line="4" column="3">New fridge bio fresh</Cell-Text>
<Cell-Text line="4" column="4">This refrigerator Built / skinnable 4 * offers a useful volume of 132 L to a height 82 cm niche, to be installed under the work plan. Comfort finish, the interior equipment in glass and ABS has a white LED lighting.</Cell-Text>
<Cell-Number line="4" column="5">835</Cell-Number>
</Cells>
</Sheet>
</Sheets>
</File>
</Generate-Excel>1
2
3
4
5
6
7
8
9
10
11
12
13
14
15
16
17
18
19
20
21
22
23
24
25
26
27
28
29
30
31
2
3
4
5
6
7
8
9
10
11
12
13
14
15
16
17
18
19
20
21
22
23
24
25
26
27
28
29
30
31
To do this transformation we have used the Transform XSLT task. If you have never heard about XSLT, XPath or XSD here is some quick definitions:
- XSLT is used to transform XML documents into XML and into various other types of document.
- XPath is used to navigate XML documents.
- XSD is used to validate XML documents.
Before explaining the XSLT of the previous tutorial we are going to view how XSLT can be generated and validated locally with the VS Code Extension, and then we will explain how to create the XSLT used in the previous tutorial.
Best practice
Even if you are already familiar with these technologies, do this tutorial.
Reminder
Before starting, a quick reminder on the difference between element and attribute in an xml file.
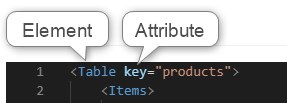
An xslt is an xml file but with specific elements prefixed with xsl:.
This is an xml element:
xml
<Table />1
This is also an xml element, but also an xsl function:
xml
<xsl:copy-of select="" />1
Main template
In the assets folder, create a new file named my-xslt.xslt and use the snippet sty to get the main template.
Below some comments about the xslt structure:
xml
<xsl:stylesheet
    xmlns:xsl="http://www.w3.org/1999/XSL/Transform"
    xmlns:fn="fn"
    xmlns:pl="http://product-live.com"
    xmlns:xs="http://www.w3.org/2001/XMLSchema"
    version="3.0"
    exclude-result-prefixes="xs fn pl">
    <!--
        All your xslt files must have this structure.
        xsl:output is required and define some output properties.
        @method can be xml|html|xhtml|text|json this must be the same as the extension file of the outputParameter fileName of the task.
        @indent can be yes|no if yes and @method = xml|html|xhtml|json then the output file will be indented.
        @encoding always set UTF-8.
        @cdata-section-elements if you need cdata on specific elements, you can set the element's name separated by a space.
     -->
    <xsl:output method="xml" indent="yes" encoding="UTF-8" cdata-section-elements="" />

    <!-- This is the entry point of your stylesheet -->
    <xsl:template match="/">
        <!-- your code goes here -->
    </xsl:template>
</xsl:stylesheet>
1
2
3
4
5
6
7
8
9
10
11
12
13
14
15
16
17
18
19
20
21
22
2
3
4
5
6
7
8
9
10
11
12
13
14
15
16
17
18
19
20
21
22
Add an input file to run the XSLT
First select three products in https://app.product-live.com and run the Job Export excel.
Then go to https://settings.product-live.com in Data Factory > Actions.
Search for your last actions and open the detail of the execution. Here you can download the output of the task Export Items:
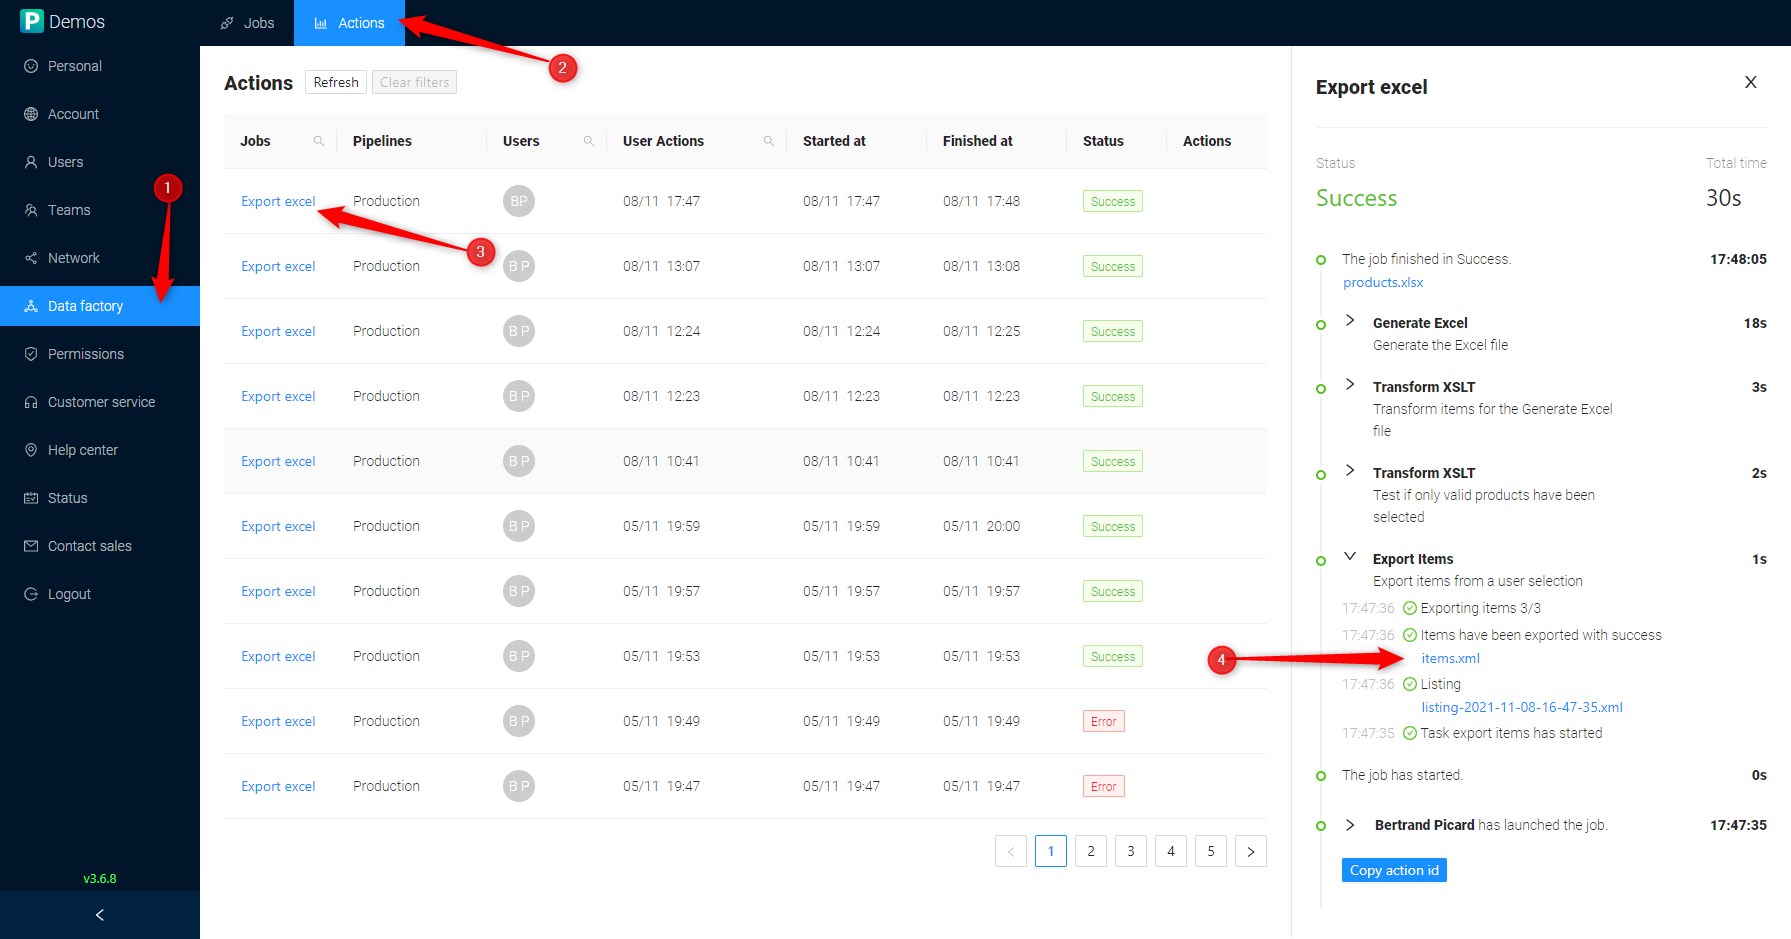
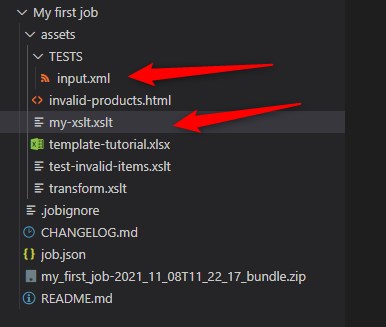
Click on items.xml to download it. Then copy this file to the TESTS folder which is in the assets folder of your Job. The file name must not contain spaces, if you have a doubt, rename this file input.xml. You must have:
Open this file in VS Code. As you can the file is not indented. To indent a file :
- Select all content with the shortcut
Ctrl + A - Indent the content with the shortcut
Shit + Alt + I
Troubleshooting
If you have a message from VS Code saying that you do not have a formatter for this file, then open the extension panel on the left and search for an extension named XML Tools. Install this extension and try again to indent your code like above.
Then we will indicate to the xslt file that the file input.xml must be used as input. For this click here at the bottom:
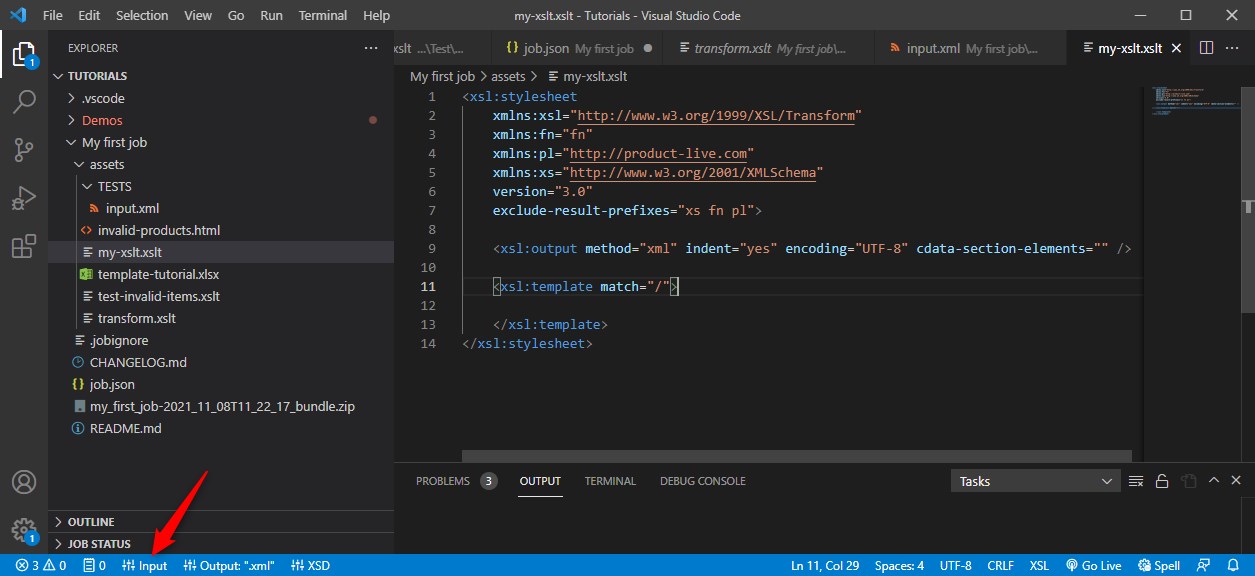
And select assets/TESTS/input.xml in the prompt select:
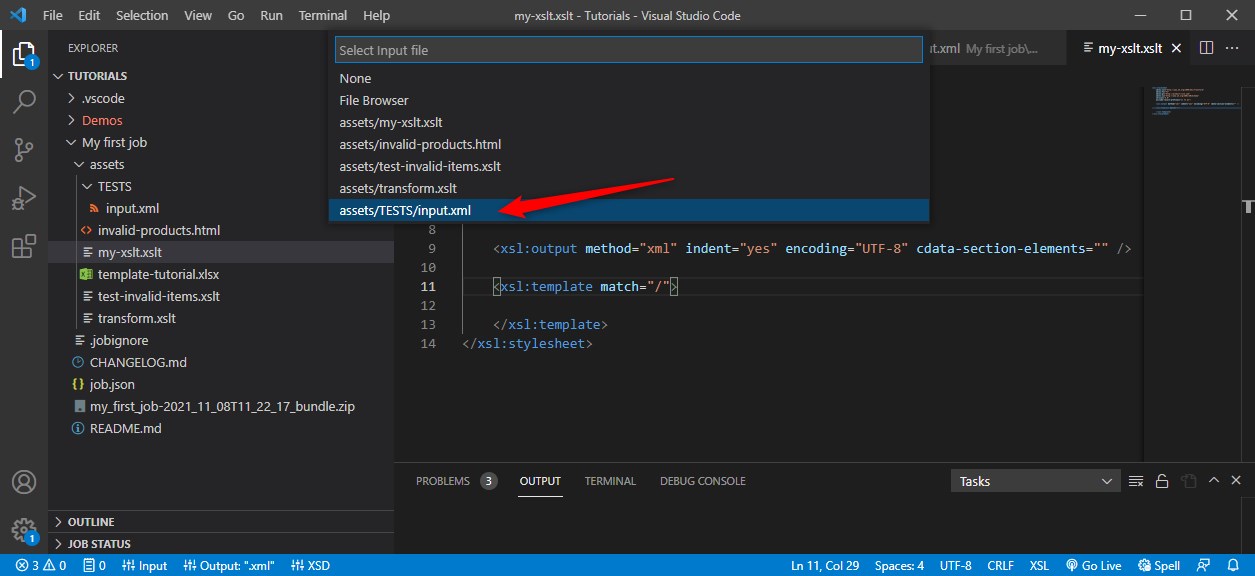
Run the XSLT locally
Now click on Run XSLT on the bottom (this will save and run your xslt):
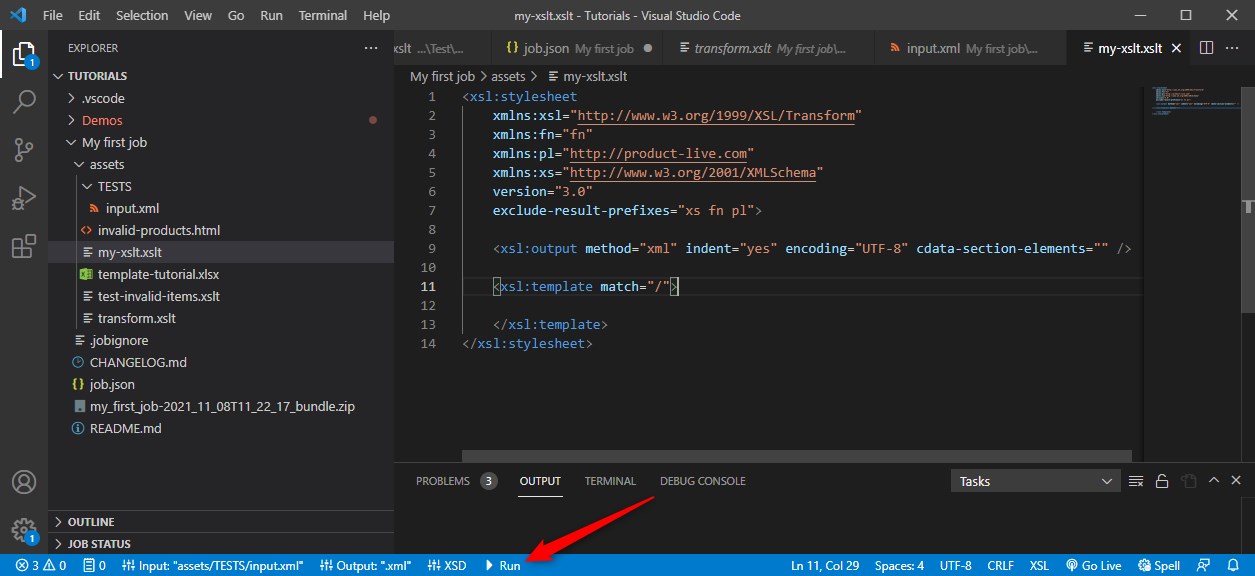
As you can see:
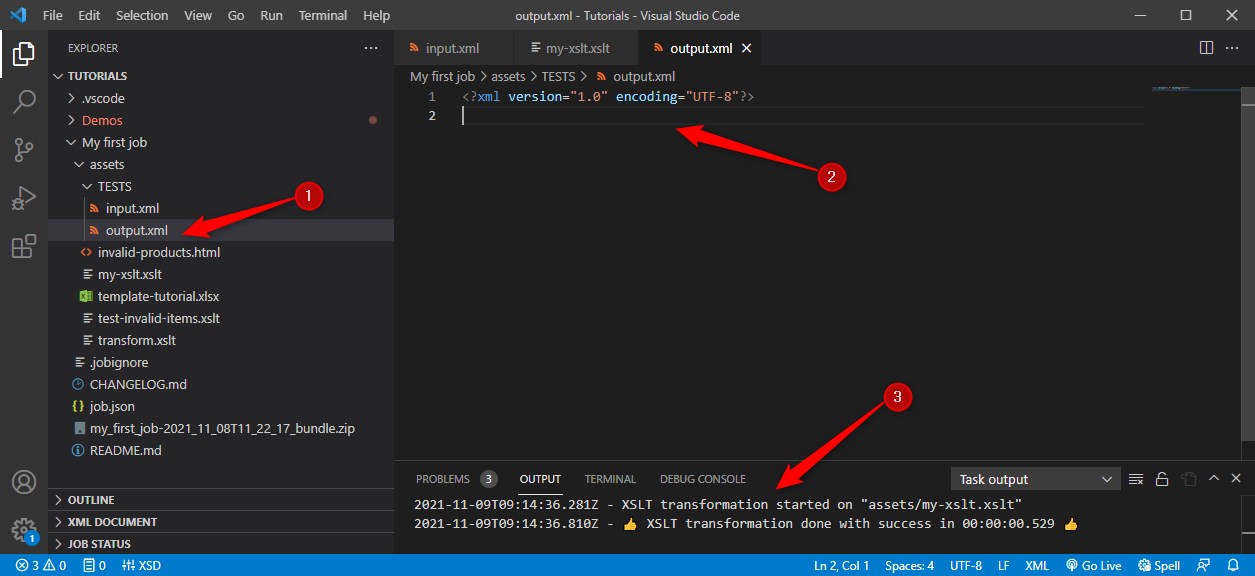
- It had generated an xml file named
output.xmlin the same folder selected for your input file. - This file is the result of your XSLT, and because your do nothing, the output xml is empty.
- You can view some statistics in the OUTPUT panel of VS Code (we will use it later to debug XSLT).
Best practice
Instead of using the button Run XSLT, use the shortcut Ctrl + Enter on your xslt file. This will save and run your XSLT.
To be more efficient you can display the xslt and the output into two windows like this:
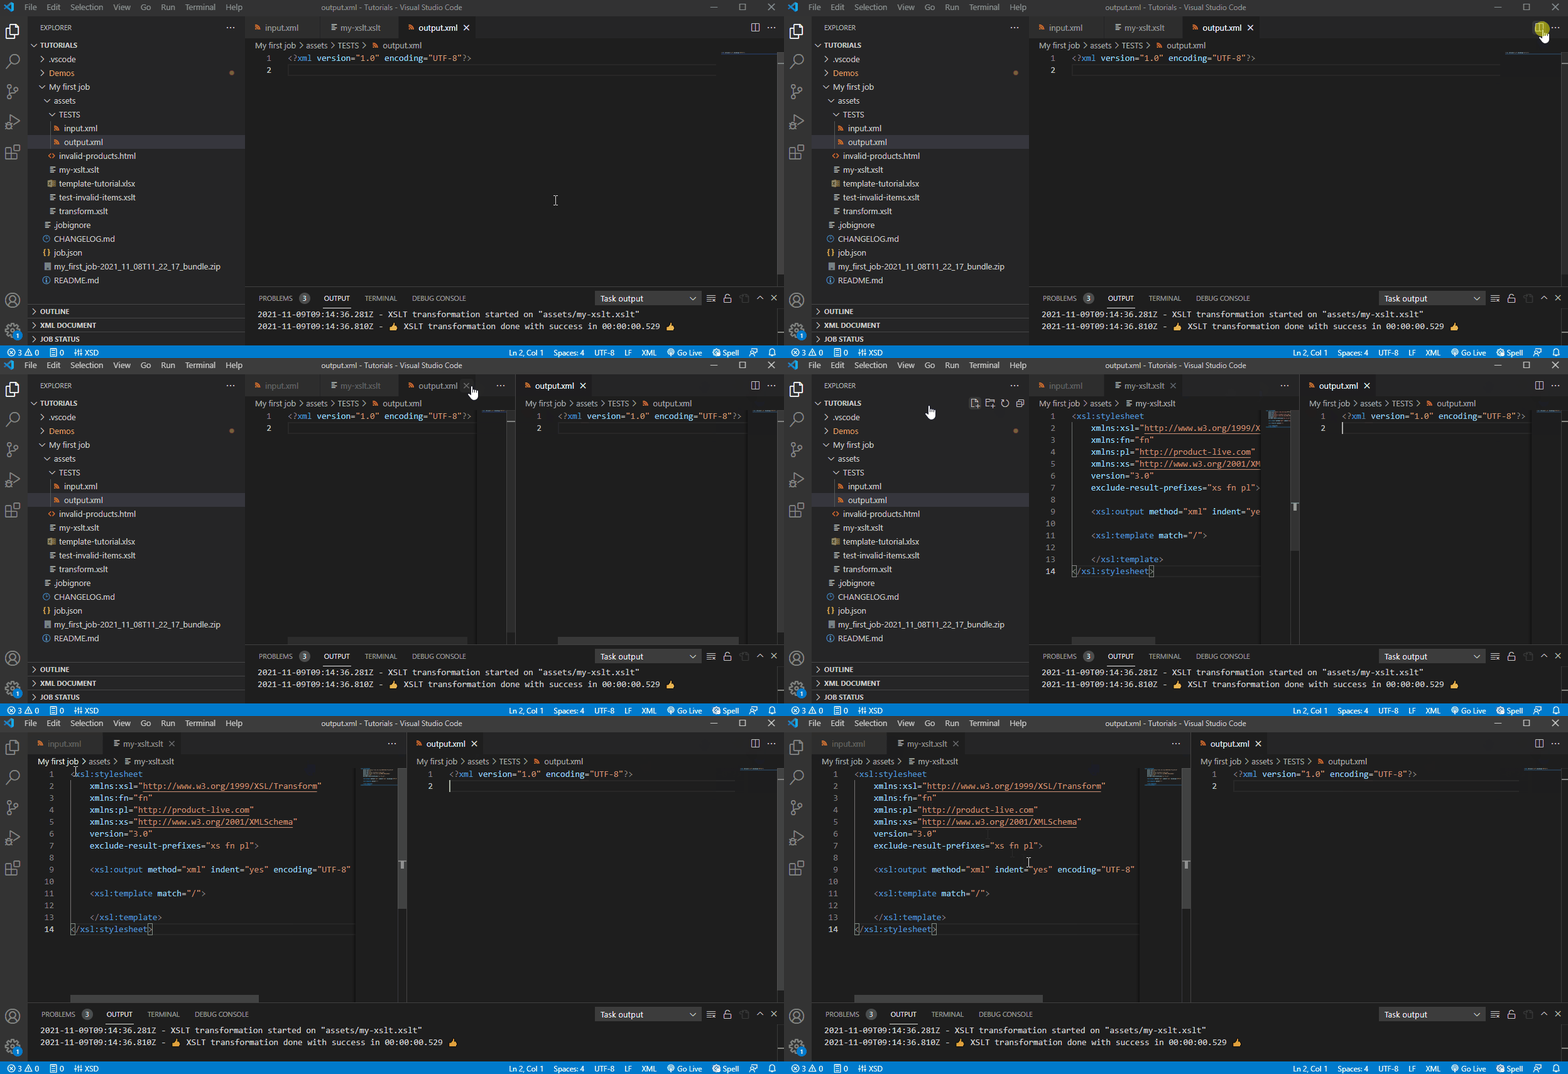
Best practice
If you have a large screen you can set three windows, one for each file: input, xslt, output.
Great! Now you can run XSLT locally.
Next we will learn about some basic xslt functions and concepts, and then we will learn how to create the XSLT that generates an XML for the Generate Excel task of the previous tutorials.
Basic XSLT
This is just an introduction not a full course. The main goal is to present how the extension can help you to write xslt files.
Simple for each loop
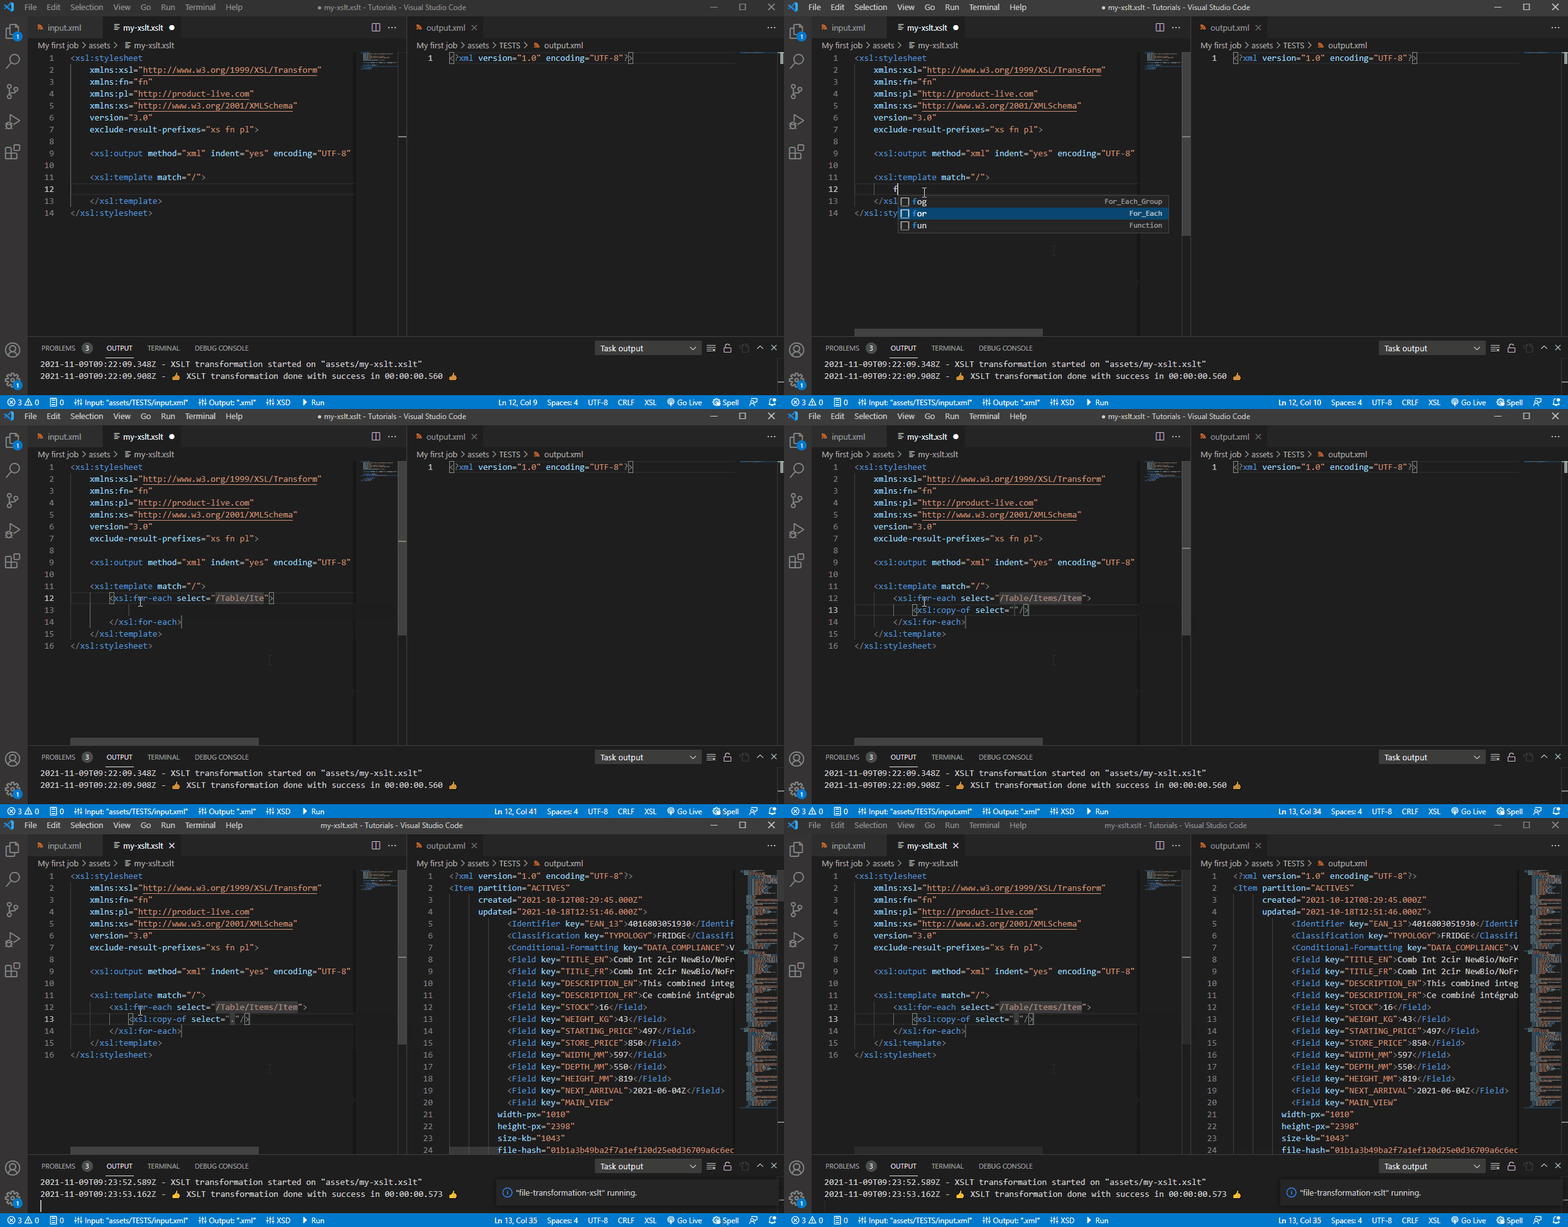
A lot of xsl functions are accessible with snippets. For example to get the for loop start typing for within your xslt file, and then use the tabulation key to go to the next attribute that you have to fill. You must have:
xml
<xsl:for-each select="/Table/Items/Item">
    <xsl:copy-of select="."/>
</xsl:for-each>
1
2
3
2
3
xsl functions starts with xsl:. xsl:for-each allows to do a loop on a sequence, and xsl:copy-of to copy the element defined in the attribute select.
In the select attribute we use an XPath. XPath is a query language that is used for traversing through an XML document.
In this example /Table/Items/Item allows to select Item element, and . means the current element relative to the upper XPath, therefore the current element is an Item element, this why you can view that all Item elements have been copied in the output.
Get only the Identifier with key = EAN_13 in a new ean element
Now we want to display only the Identifier with the key EAN_13. We also want to wrap the values in a new ean element. For this we will use the xsl function xsl:value-of and update the code like below:
xml
<xsl:for-each select="/Table/Items/Item">
    <ean>
        <xsl:value-of select="Identifier[@key='EAN_13']"/>
    </ean>
</xsl:for-each>
1
2
3
4
5
2
3
4
5
You must have this result:
xml
<?xml version="1.0" encoding="UTF-8"?>
<ean>4016803051930</ean>
<ean>4016803187141</ean>
<ean>4016803167860</ean>
1
2
3
4
2
3
4
[@key='EAN_13'] is called a predicate. Predicate refers to the XPath expression written in square brackets. It allows to refers some condition.
Best practice
In this example there is only one Identifier element by Item, therefore the predicate is not required. But if in the future you add a new Identifier to your structure your xslt will be invalid. To prevent this kind of error, it's a best practice to always write XPath that uniquely identify the path.
Great! As you can see it's very easy to transform one xml format to another.
Generate Excel format
The xml format expected by the Generate Excel task is defined here.
To do so, first remove all the for loop code of your xslt. Then copy/paste the content expected by the generate excel task in your xslt, you must have:
xml
<xsl:stylesheet
    xmlns:xsl="http://www.w3.org/1999/XSL/Transform"
    xmlns:fn="fn"
    xmlns:pl="http://product-live.com"
    xmlns:xs="http://www.w3.org/2001/XMLSchema"
    version="3.0"
    exclude-result-prefixes="xs fn pl">

    <xsl:output method="xml" indent="yes" encoding="UTF-8" cdata-section-elements="" />

    <xsl:template match="/">
        <Generate-Excel>
            <File>
                <File-Name>products.xlsx</File-Name>
                <Template-Key>shoes</Template-Key>
                <Sheets>
                    <Sheet>
                        <Sheet-Name>products</Sheet-Name>
                        <Cells>
                            <Cell-Text line="1" column="1">EAN</Cell-Text>
                            <Cell-Text line="1" column="2">Price</Cell-Text>
                            <Cell-Text line="1" column="3">Image</Cell-Text>
                            <Cell-Text line="1" column="4">Link</Cell-Text>
                            <Cell-Text line="2" column="1">0123456789012</Cell-Text>
                            <Cell-Number line="2" column="2">12.3</Cell-Number>
                            <Cell-Image line="2" column="3">https://host.com/28a01a76849106eb.jpg?preset=small</Cell-Image>
                            <Cell-Link line="2" column="4" type="URL" url="http://product-live.com">Link to product-live website</Cell-Link>
                        </Cells>
                    </Sheet>
                </Sheets>
            </File>
        </Generate-Excel>
    </xsl:template>
</xsl:stylesheet>
1
2
3
4
5
6
7
8
9
10
11
12
13
14
15
16
17
18
19
20
21
22
23
24
25
26
27
28
29
30
31
32
33
34
2
3
4
5
6
7
8
9
10
11
12
13
14
15
16
17
18
19
20
21
22
23
24
25
26
27
28
29
30
31
32
33
34
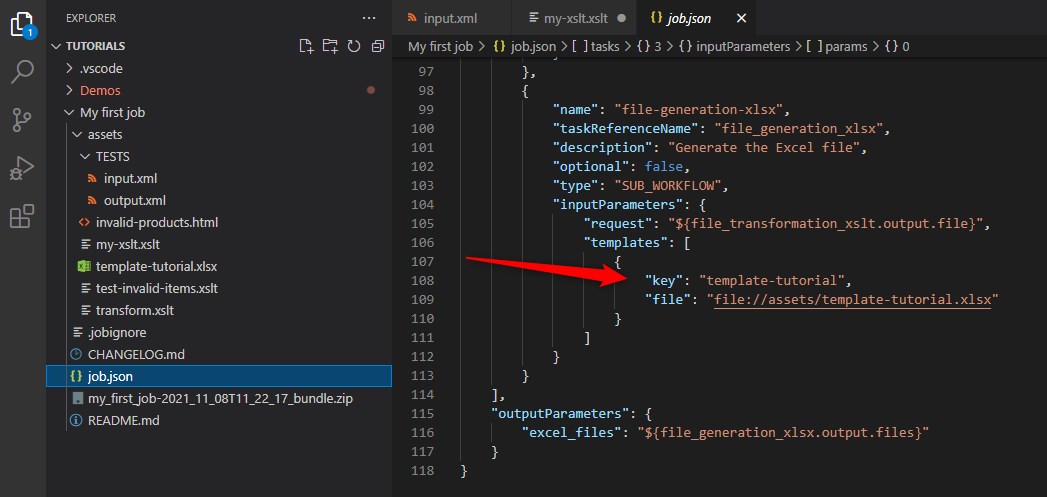
First we will update the Template-Key value from shoes to template-tutorial. As you can read it in the documentation of the task the Template-Key value must be the same that the one declared on your job.json here:
Then we will remove all the content of the Cells elements, and add a for loop within it. You must have:
xml
<xsl:stylesheet
    xmlns:xsl="http://www.w3.org/1999/XSL/Transform"
    xmlns:fn="fn"
    xmlns:pl="http://product-live.com"
    xmlns:xs="http://www.w3.org/2001/XMLSchema"
    version="3.0"
    exclude-result-prefixes="xs fn pl">

    <xsl:output method="xml" indent="yes" encoding="UTF-8" cdata-section-elements="" />

    <xsl:template match="/">
        <Generate-Excel>
            <File>
                <File-Name>products.xlsx</File-Name>
                <Template-Key>template-tutorial</Template-Key>
                <Sheets>
                    <Sheet>
                        <Sheet-Name>products</Sheet-Name>
                        <Cells>
                            <xsl:for-each select="/Table/Items/Item">

                            </xsl:for-each>
                        </Cells>
                    </Sheet>
                </Sheets>
            </File>
        </Generate-Excel>
    </xsl:template>
</xsl:stylesheet>
1
2
3
4
5
6
7
8
9
10
11
12
13
14
15
16
17
18
19
20
21
22
23
24
25
26
27
28
29
2
3
4
5
6
7
8
9
10
11
12
13
14
15
16
17
18
19
20
21
22
23
24
25
26
27
28
29
Then we will add a variable to store the index of each line. This index must be equal to the position in the loop + 1 because there is one line of headers. The position within for loop is accessible with position(). Then update the code like below, do not forget to use snippet to write your xsl functions, here use the snippet var:
xml
<xsl:stylesheet
    xmlns:xsl="http://www.w3.org/1999/XSL/Transform"
    xmlns:fn="fn"
    xmlns:pl="http://product-live.com"
    xmlns:xs="http://www.w3.org/2001/XMLSchema"
    version="3.0"
    exclude-result-prefixes="xs fn pl">

    <xsl:output method="xml" indent="yes" encoding="UTF-8" cdata-section-elements="" />

    <xsl:template match="/">
        <Generate-Excel>
            <File>
                <File-Name>products.xlsx</File-Name>
                <Template-Key>template-tutorial</Template-Key>
                <Sheets>
                    <Sheet>
                        <Sheet-Name>products</Sheet-Name>
                        <Cells>
                            <xsl:for-each select="/Table/Items/Item">
                                <!-- + 1 for headers -->
                                <xsl:variable name="position" select="position()+1" />
                            </xsl:for-each>
                        </Cells>
                    </Sheet>
                </Sheets>
            </File>
        </Generate-Excel>
    </xsl:template>
</xsl:stylesheet>
1
2
3
4
5
6
7
8
9
10
11
12
13
14
15
16
17
18
19
20
21
22
23
24
25
26
27
28
29
30
2
3
4
5
6
7
8
9
10
11
12
13
14
15
16
17
18
19
20
21
22
23
24
25
26
27
28
29
30
Then we will add the Cell elements. But before remember that you must only set Cell elements if the value is not empty. For this we will add a test for each or values. Let's start with the value of the EAN_13 identifier. Use the snippet if to add the if statement and then copy/paste the Cell-Text element from the documentation. You must have:
xml
<xsl:stylesheet
    xmlns:xsl="http://www.w3.org/1999/XSL/Transform"
    xmlns:fn="fn"
    xmlns:pl="http://product-live.com"
    xmlns:xs="http://www.w3.org/2001/XMLSchema"
    version="3.0"
    exclude-result-prefixes="xs fn pl">

    <xsl:output method="xml" indent="yes" encoding="UTF-8" cdata-section-elements="" />

    <xsl:template match="/">
        <Generate-Excel>
            <File>
                <File-Name>products.xlsx</File-Name>
                <Template-Key>template-tutorial</Template-Key>
                <Sheets>
                    <Sheet>
                        <Sheet-Name>products</Sheet-Name>
                        <Cells>
                            <xsl:for-each select="/Table/Items/Item">
                                <!-- + 1 for headers -->
                                <xsl:variable name="position" select="position()+1" />
                                <xsl:if test="exists(Identifier[@key='EAN_13'])">
                                    <Cell-Text line="{$position}" column="2"><xsl:value-of select="Identifier[@key='EAN_13']"/></Cell-Text>
                                </xsl:if>
                            </xsl:for-each>
                        </Cells>
                    </Sheet>
                </Sheets>
            </File>
        </Generate-Excel>
    </xsl:template>
</xsl:stylesheet>
1
2
3
4
5
6
7
8
9
10
11
12
13
14
15
16
17
18
19
20
21
22
23
24
25
26
27
28
29
30
31
32
33
2
3
4
5
6
7
8
9
10
11
12
13
14
15
16
17
18
19
20
21
22
23
24
25
26
27
28
29
30
31
32
33
- The
existsfunction allows to test if an element exist and is not empty. - Variables are accessible with
$, for example here$position {}used in thelineattribute indicates that the value must be used here. If you forget to use{}it will simply right $position in the line attribute.
Run this xslt you must have this output:
xml
<?xml version="1.0" encoding="UTF-8"?>
<Generate-Excel>
   <File>
      <File-Name>products.xlsx</File-Name>
      <Template-Key>template-tutorial</Template-Key>
      <Sheets>
         <Sheet>
            <Sheet-Name>products</Sheet-Name>
            <Cells>
               <Cell-Text line="2" column="2">4016803051930</Cell-Text>
               <Cell-Text line="3" column="2">4016803187141</Cell-Text>
               <Cell-Text line="4" column="2">4016803167860</Cell-Text>
            </Cells>
         </Sheet>
      </Sheets>
   </File>
</Generate-Excel>
1
2
3
4
5
6
7
8
9
10
11
12
13
14
15
16
17
2
3
4
5
6
7
8
9
10
11
12
13
14
15
16
17
Great! But do this xml is a valid xml for the task Generate Excel?
To control the xml that you are locally generating, the extension allows to set a control.
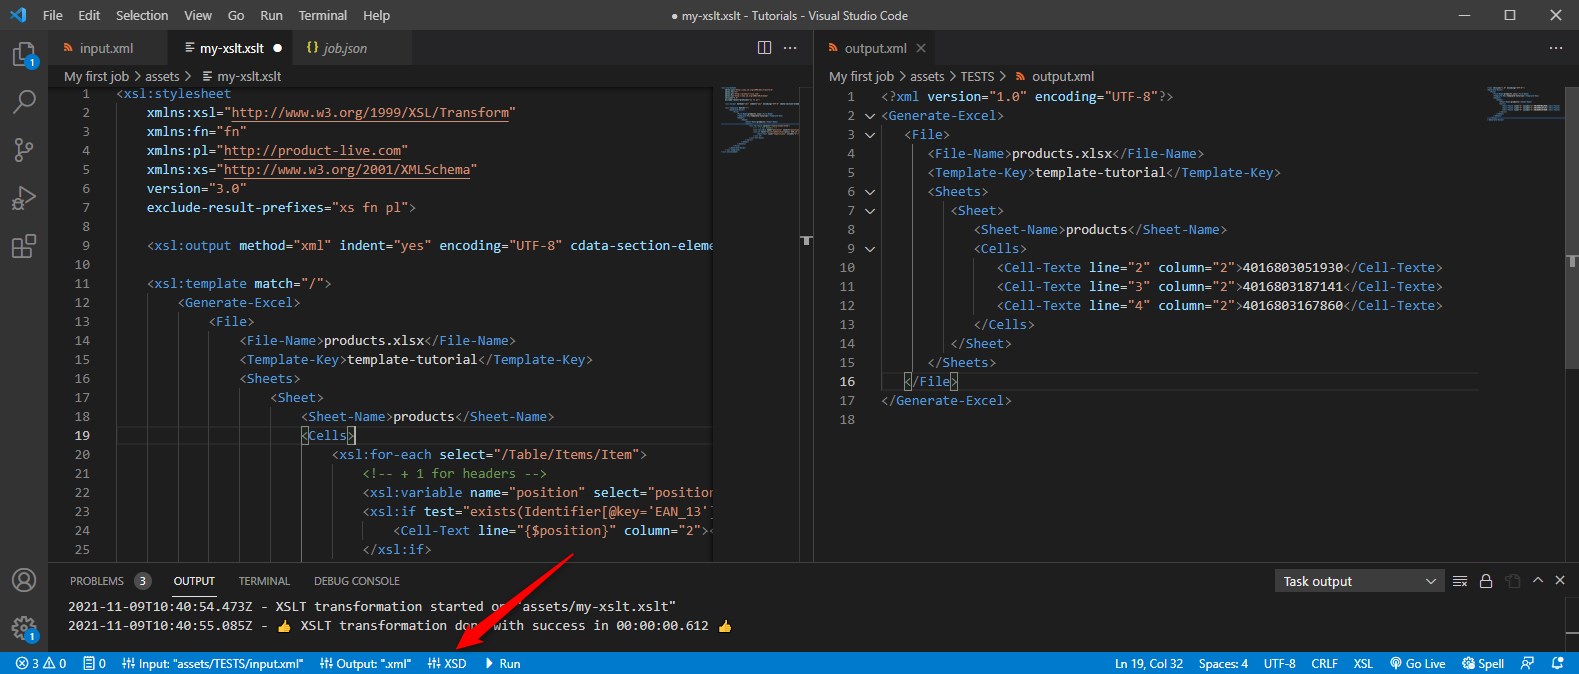
In the bottom bar, click on the XSD button:
And select Generate Excel:
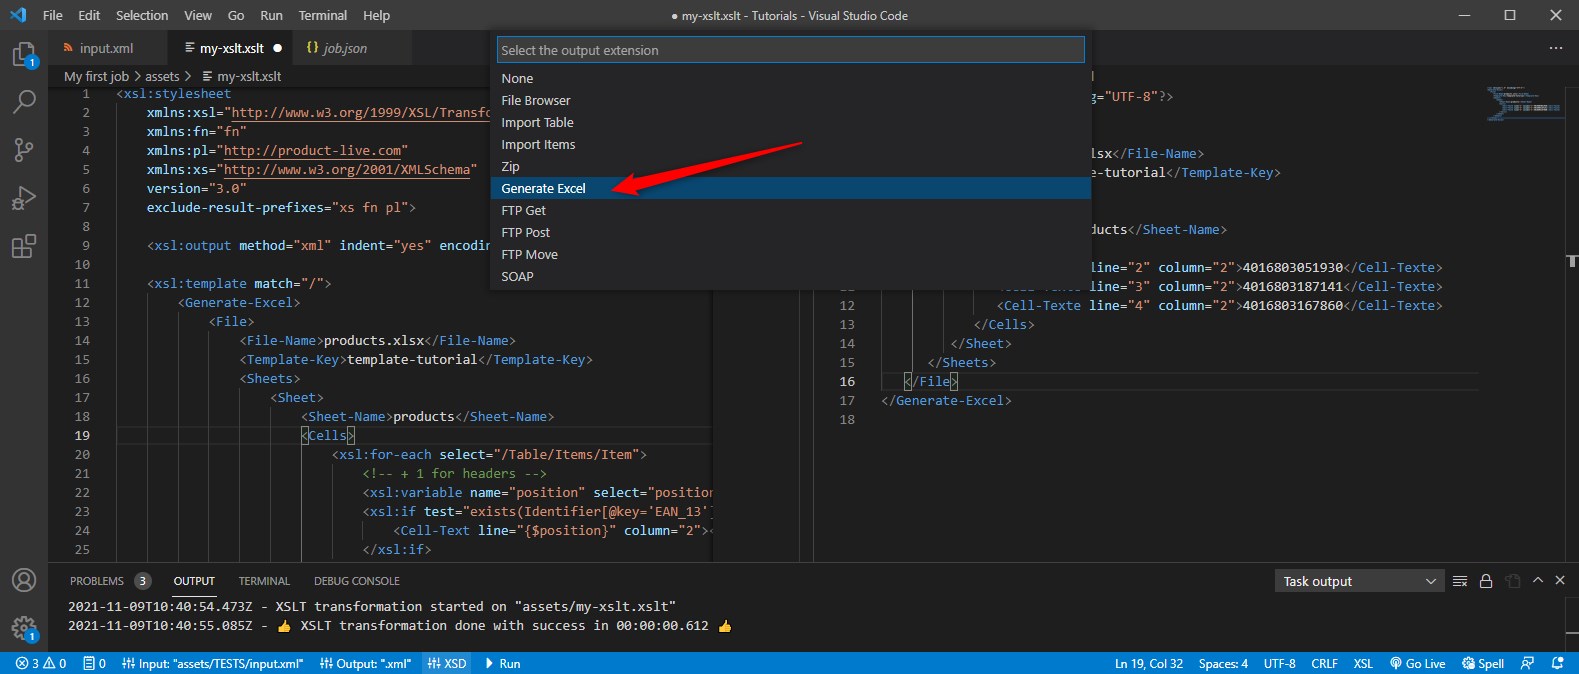
Now when you will run your XSLT, it will:
- Save your current XSLT file
- Run the XSLT
- Control the XML generated for the selected task
So now run your xslt using the shortcut Ctrl + Enter.
You must have this message within the output.
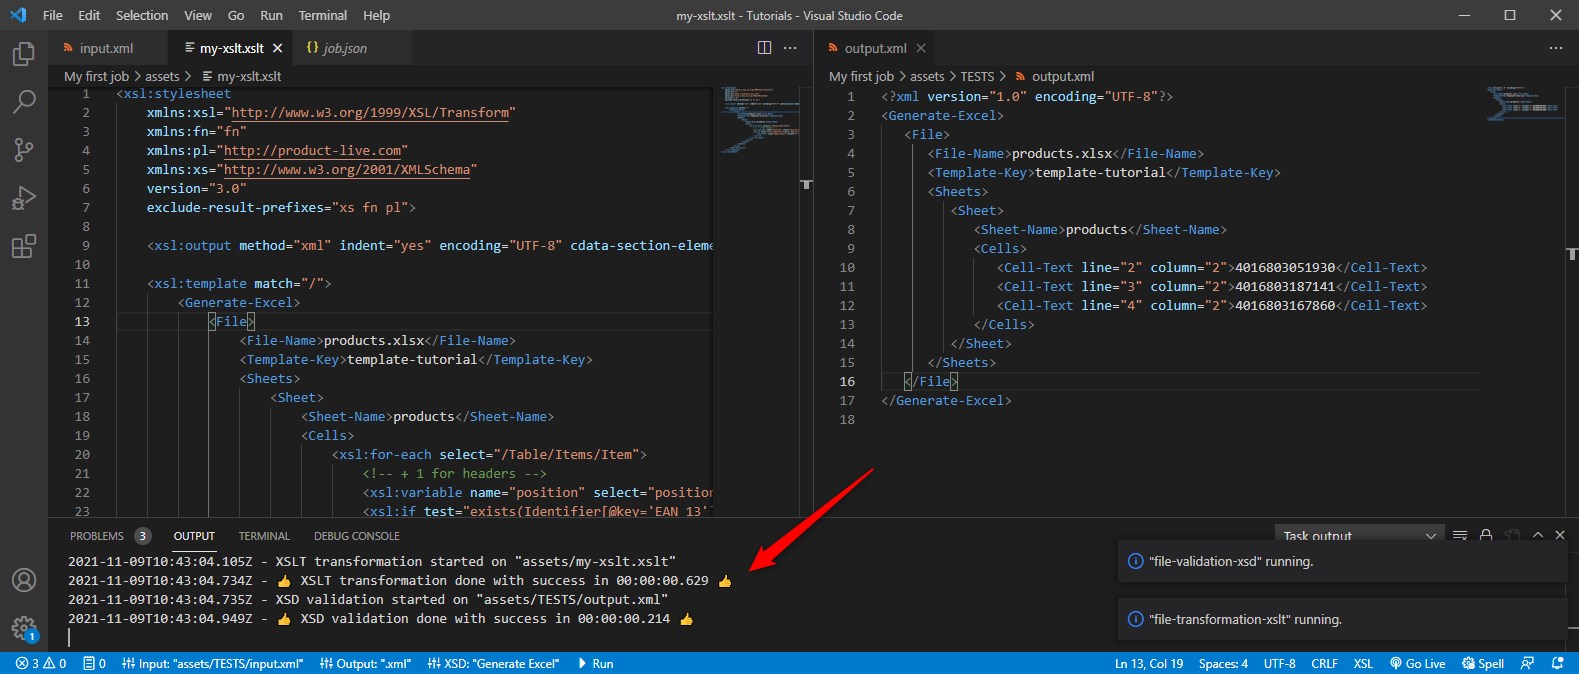
One line for the validity of the xslt and one line for the validity of the xml for the task selected.
Congratulation! Your xslt is valid and the xml that you have generated is valid for the Generate Excel task.
Debugging
XSLT
If you have errors on your XSLT they will be prompted here at the execution:
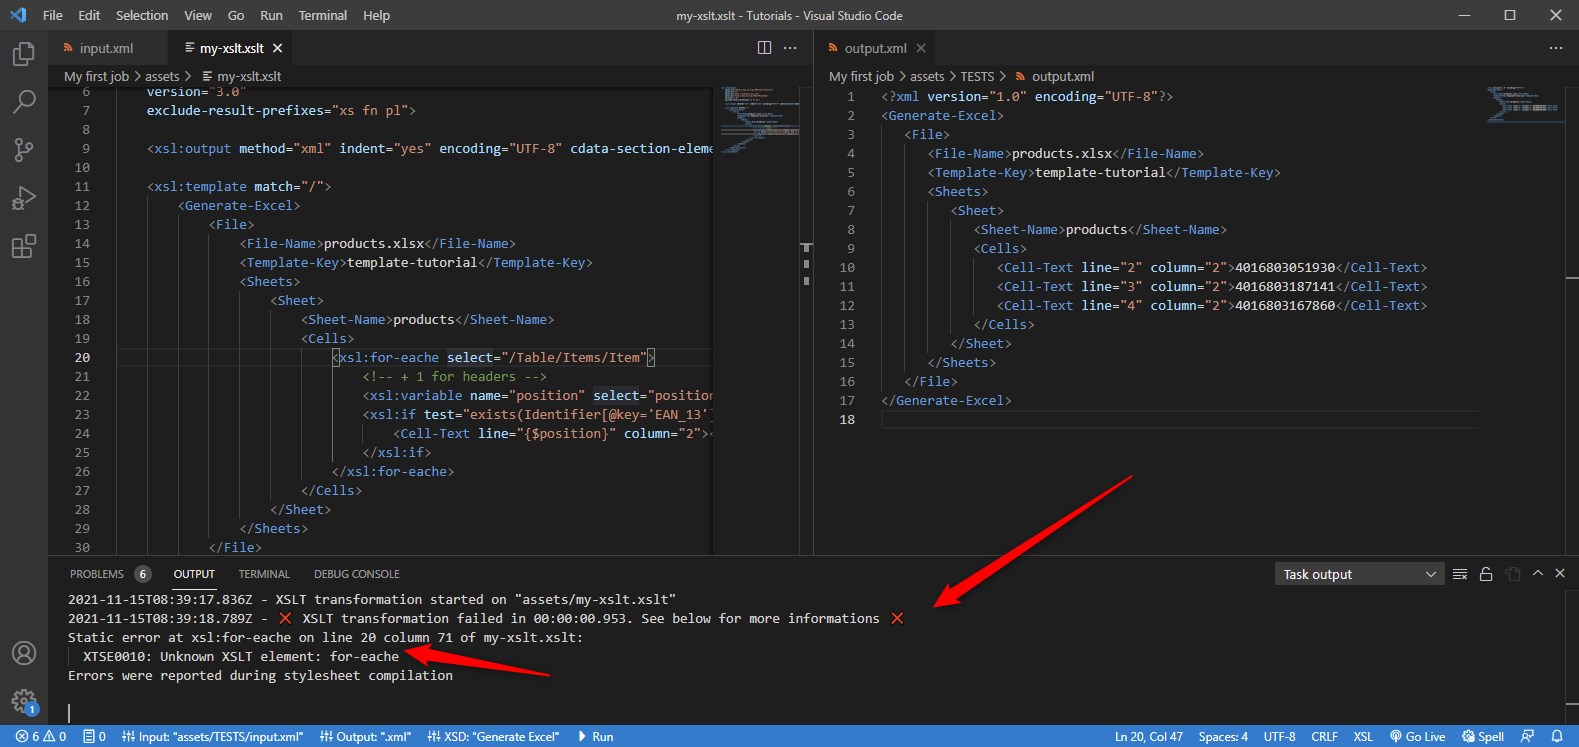
The output indicates the line where there is the error.
If you need to log the content of a variable you can use the xsl:message function. This function as an attribute terminate which can take the values yes | no. yes is used to stop the xslt when passing by the xsl:message. Within this function you can write text, xml or xsl functions.
The result will be prompted here:
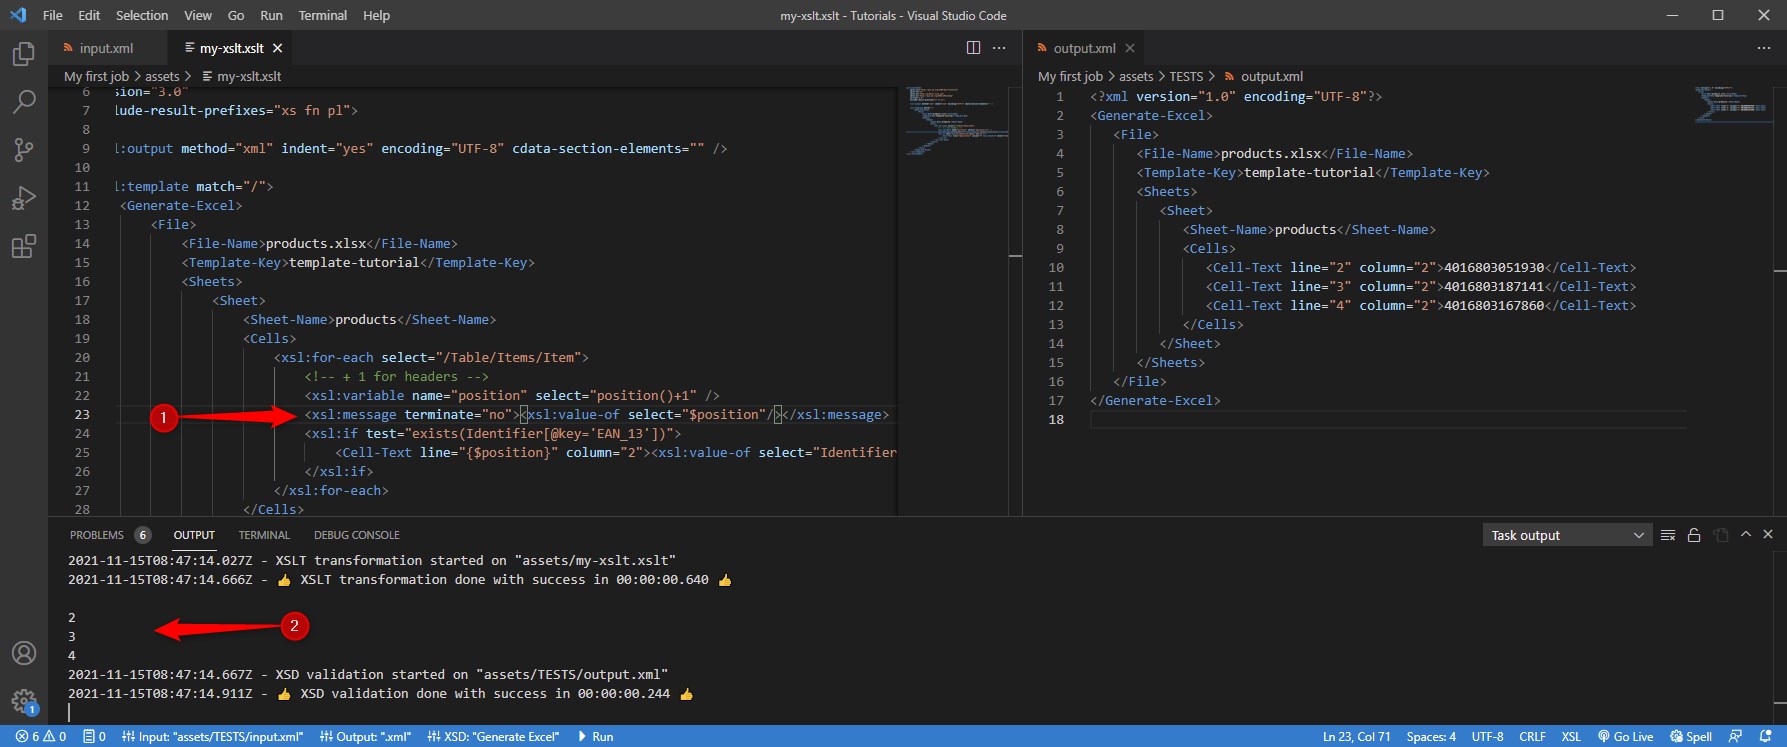
Best practice
You can use <xsl:message terminate="yes"></xsl:message> to stop a xslt task in error. This allows to implement functional tests.
XML validation
As you have seen above, you can set controls to validate the xml that you generate with xslt. If you have an error on the control, it will be displayed here:
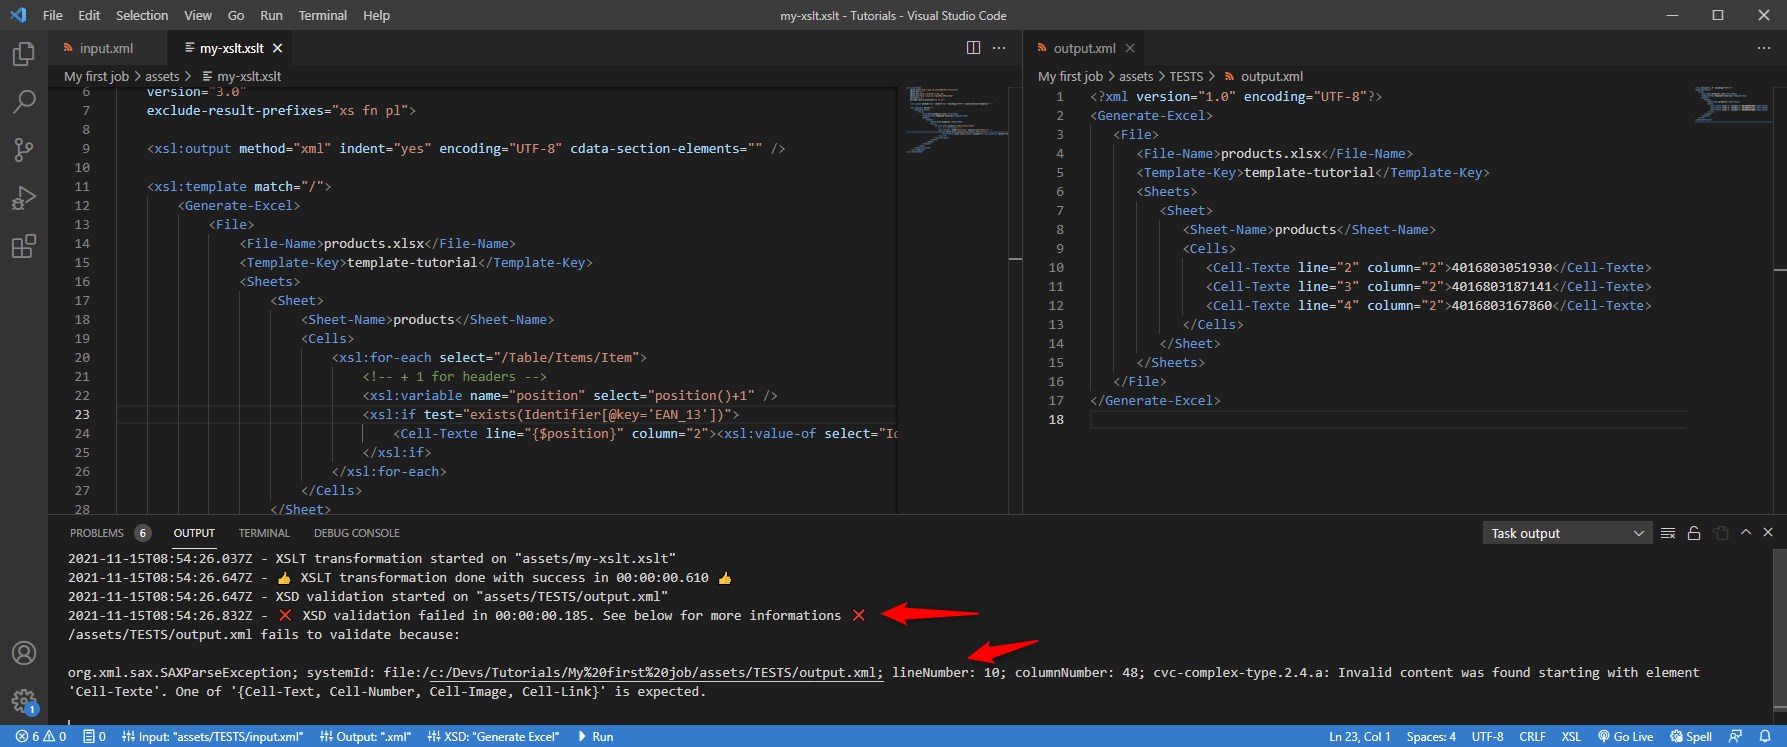
Advanced
With XSLT you can also generate CSV, JSON and HTML files. To learn more view XSLT examples and if you want to learn more about XPath read XPath examples.
If you need to read CSV files or Excel files, you must transform these files to XML first. There are tasks that can transform these files to XML, click here to learn more.
What you have learned
- XSLT is a very powerful tool to transform xml files to any other format
- XPath is very powerful for traversing xml files
- Controls can be used to validate your transformations
Next
You will learn how to use tasks Reports for your Jobs.